|
THE D.I.Y. VAN
CONVERSION
THE
TILE FLOOR
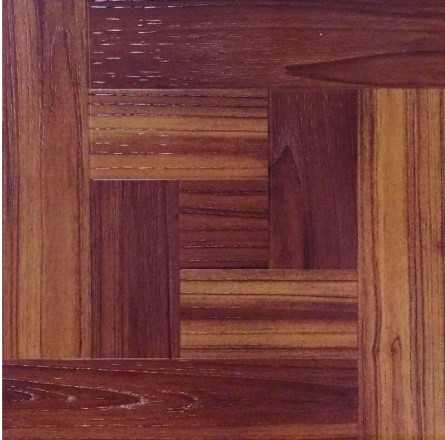
Tempered Hardboard Panel 24” x 48” – 5 @ $5.01 each TrafficMASTER Red Oak Parquet 12” x 12” Peel-and-Stick Vinyl Tile – 60 for $52.20 Varathane Polyurethane – Glossy Finish -- $0 (already had a quart)
**** MAJOR ADDENDUM BELOW
*****
The ceiling was next on the to-do list, but it was proving to be much more complicated than expected, so I needed some more time to concoct a plan.
Blinds for the driver side window and the back windows looked like they’d be up next, but they are made-to-order, so they take a few weeks to arrive.
I wanted it to look jointed, I guess, and the regular pattern of the parquet, in a hue that would complement the existing stained cedar and cognac trim, seemed really appealing. (I have to admit there is also a bit of a tip of the hat to the Boston Garden basketball court as well.)
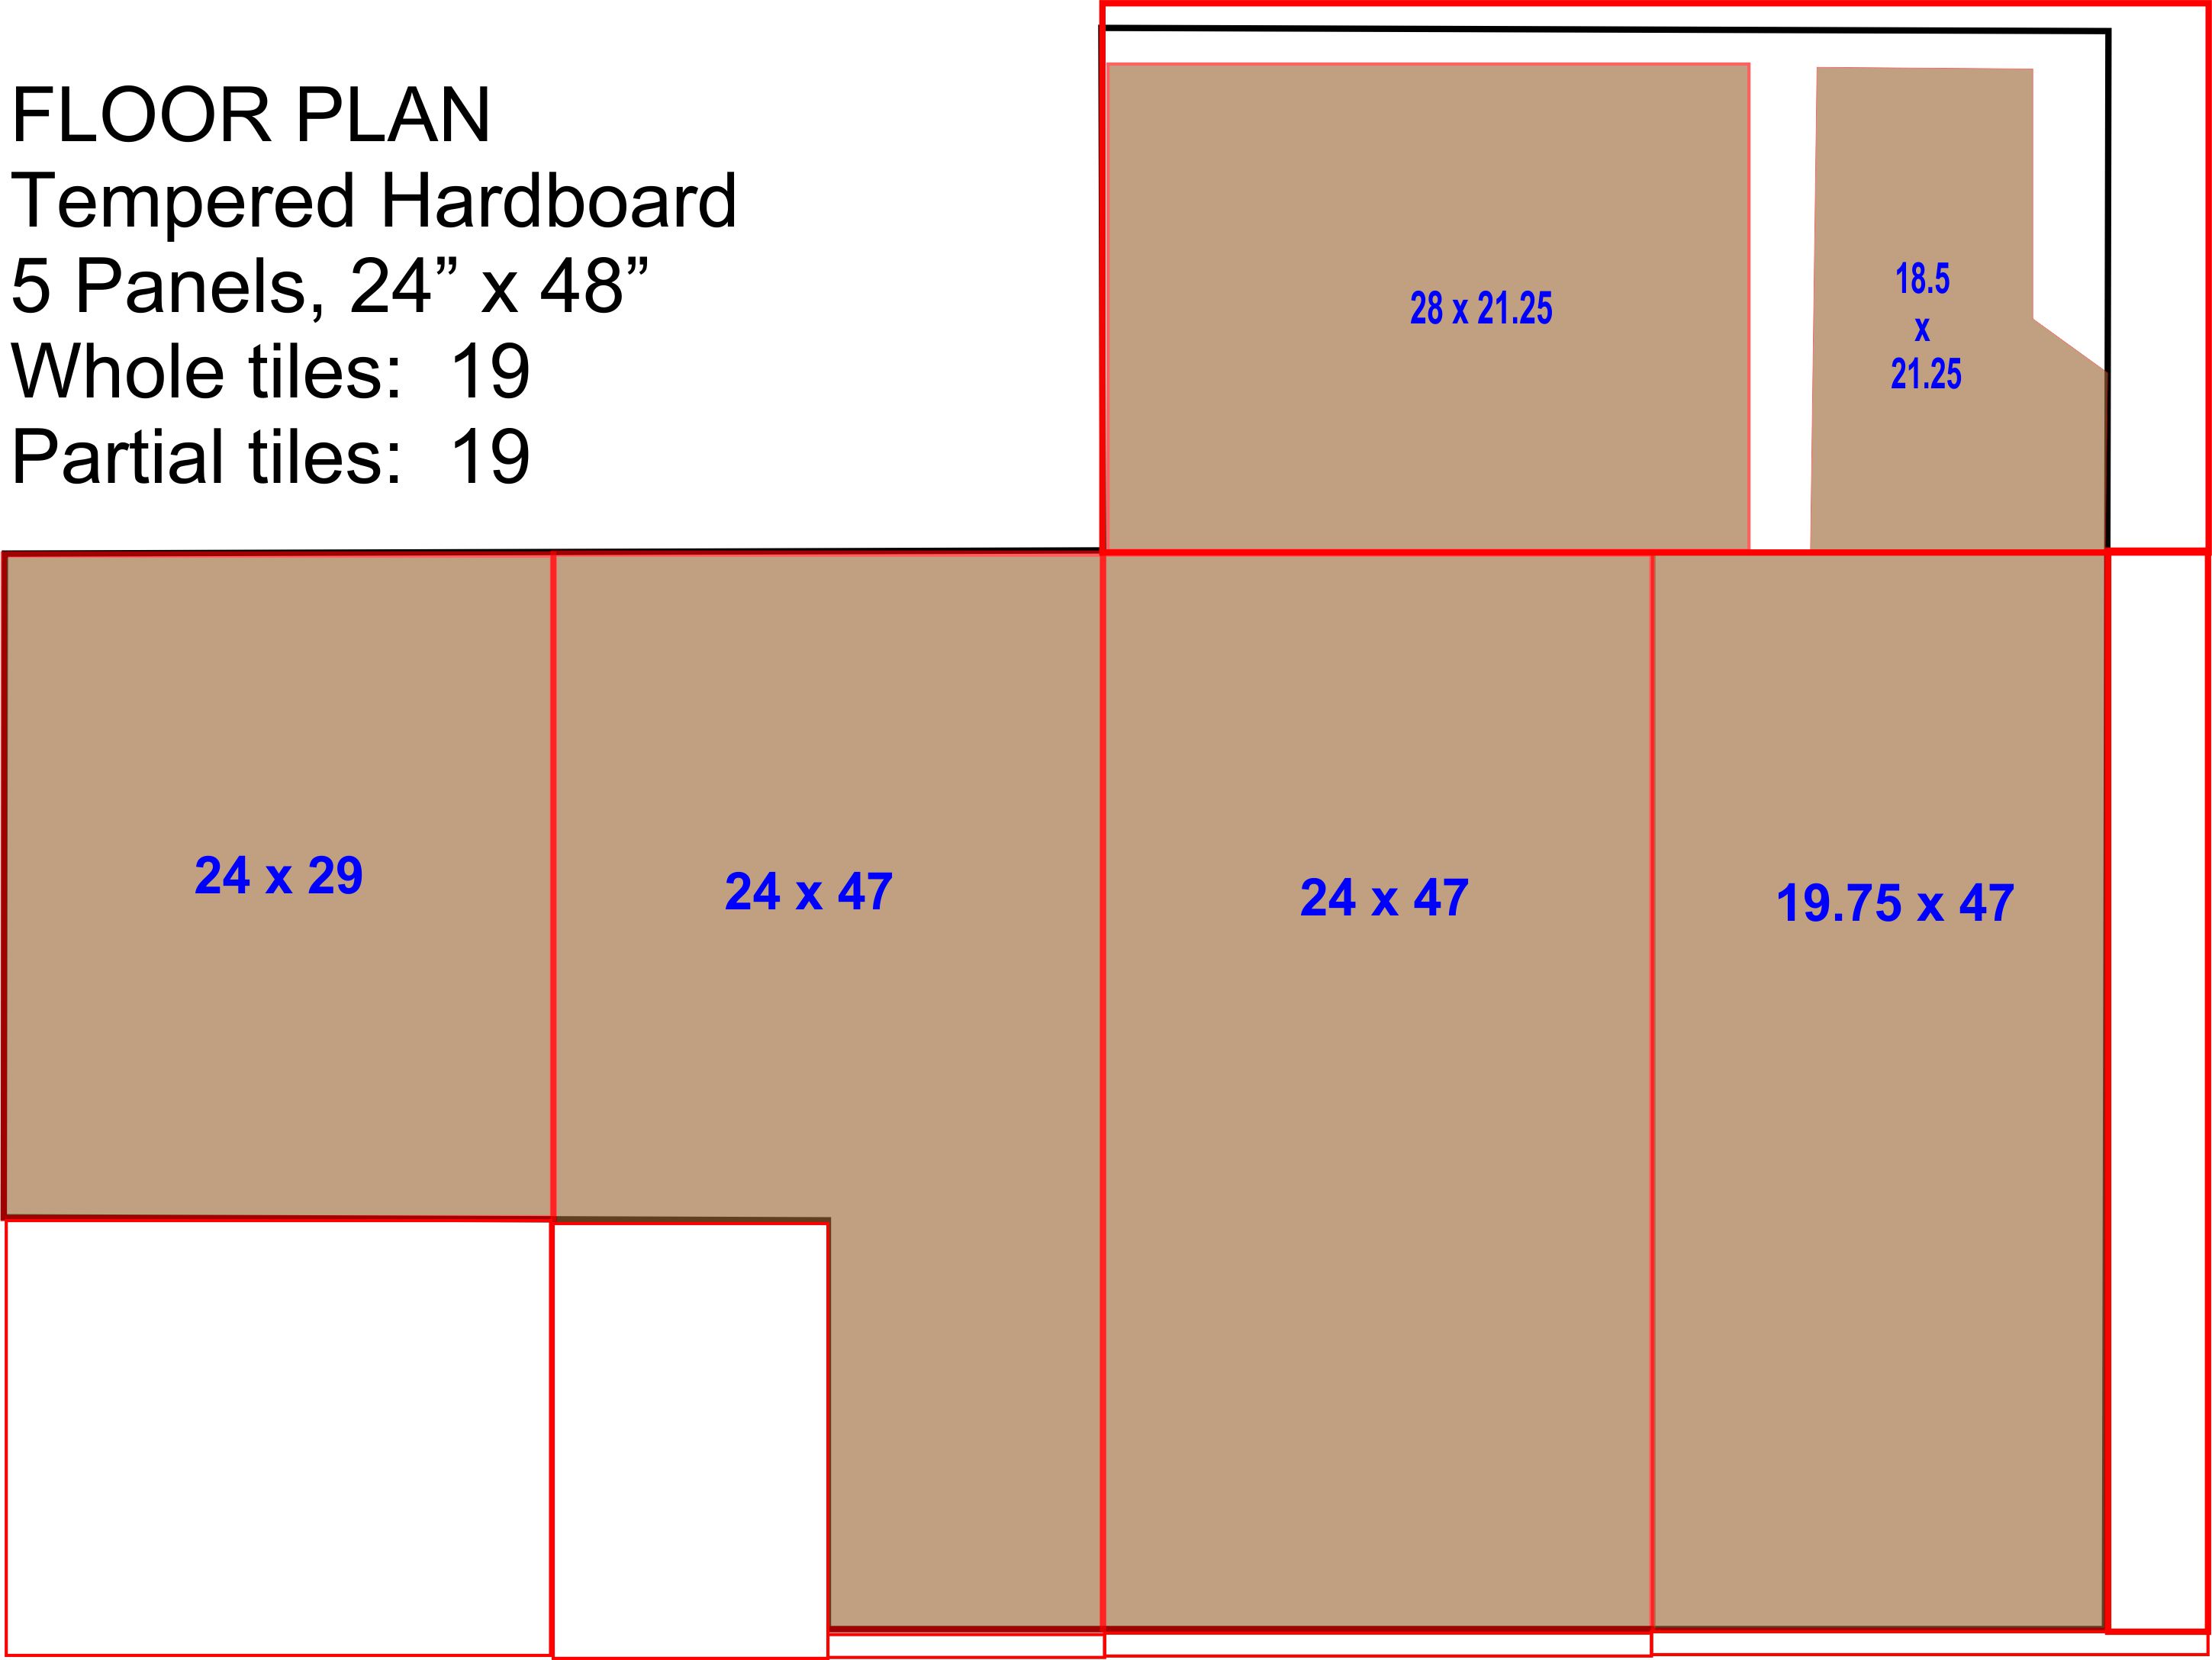
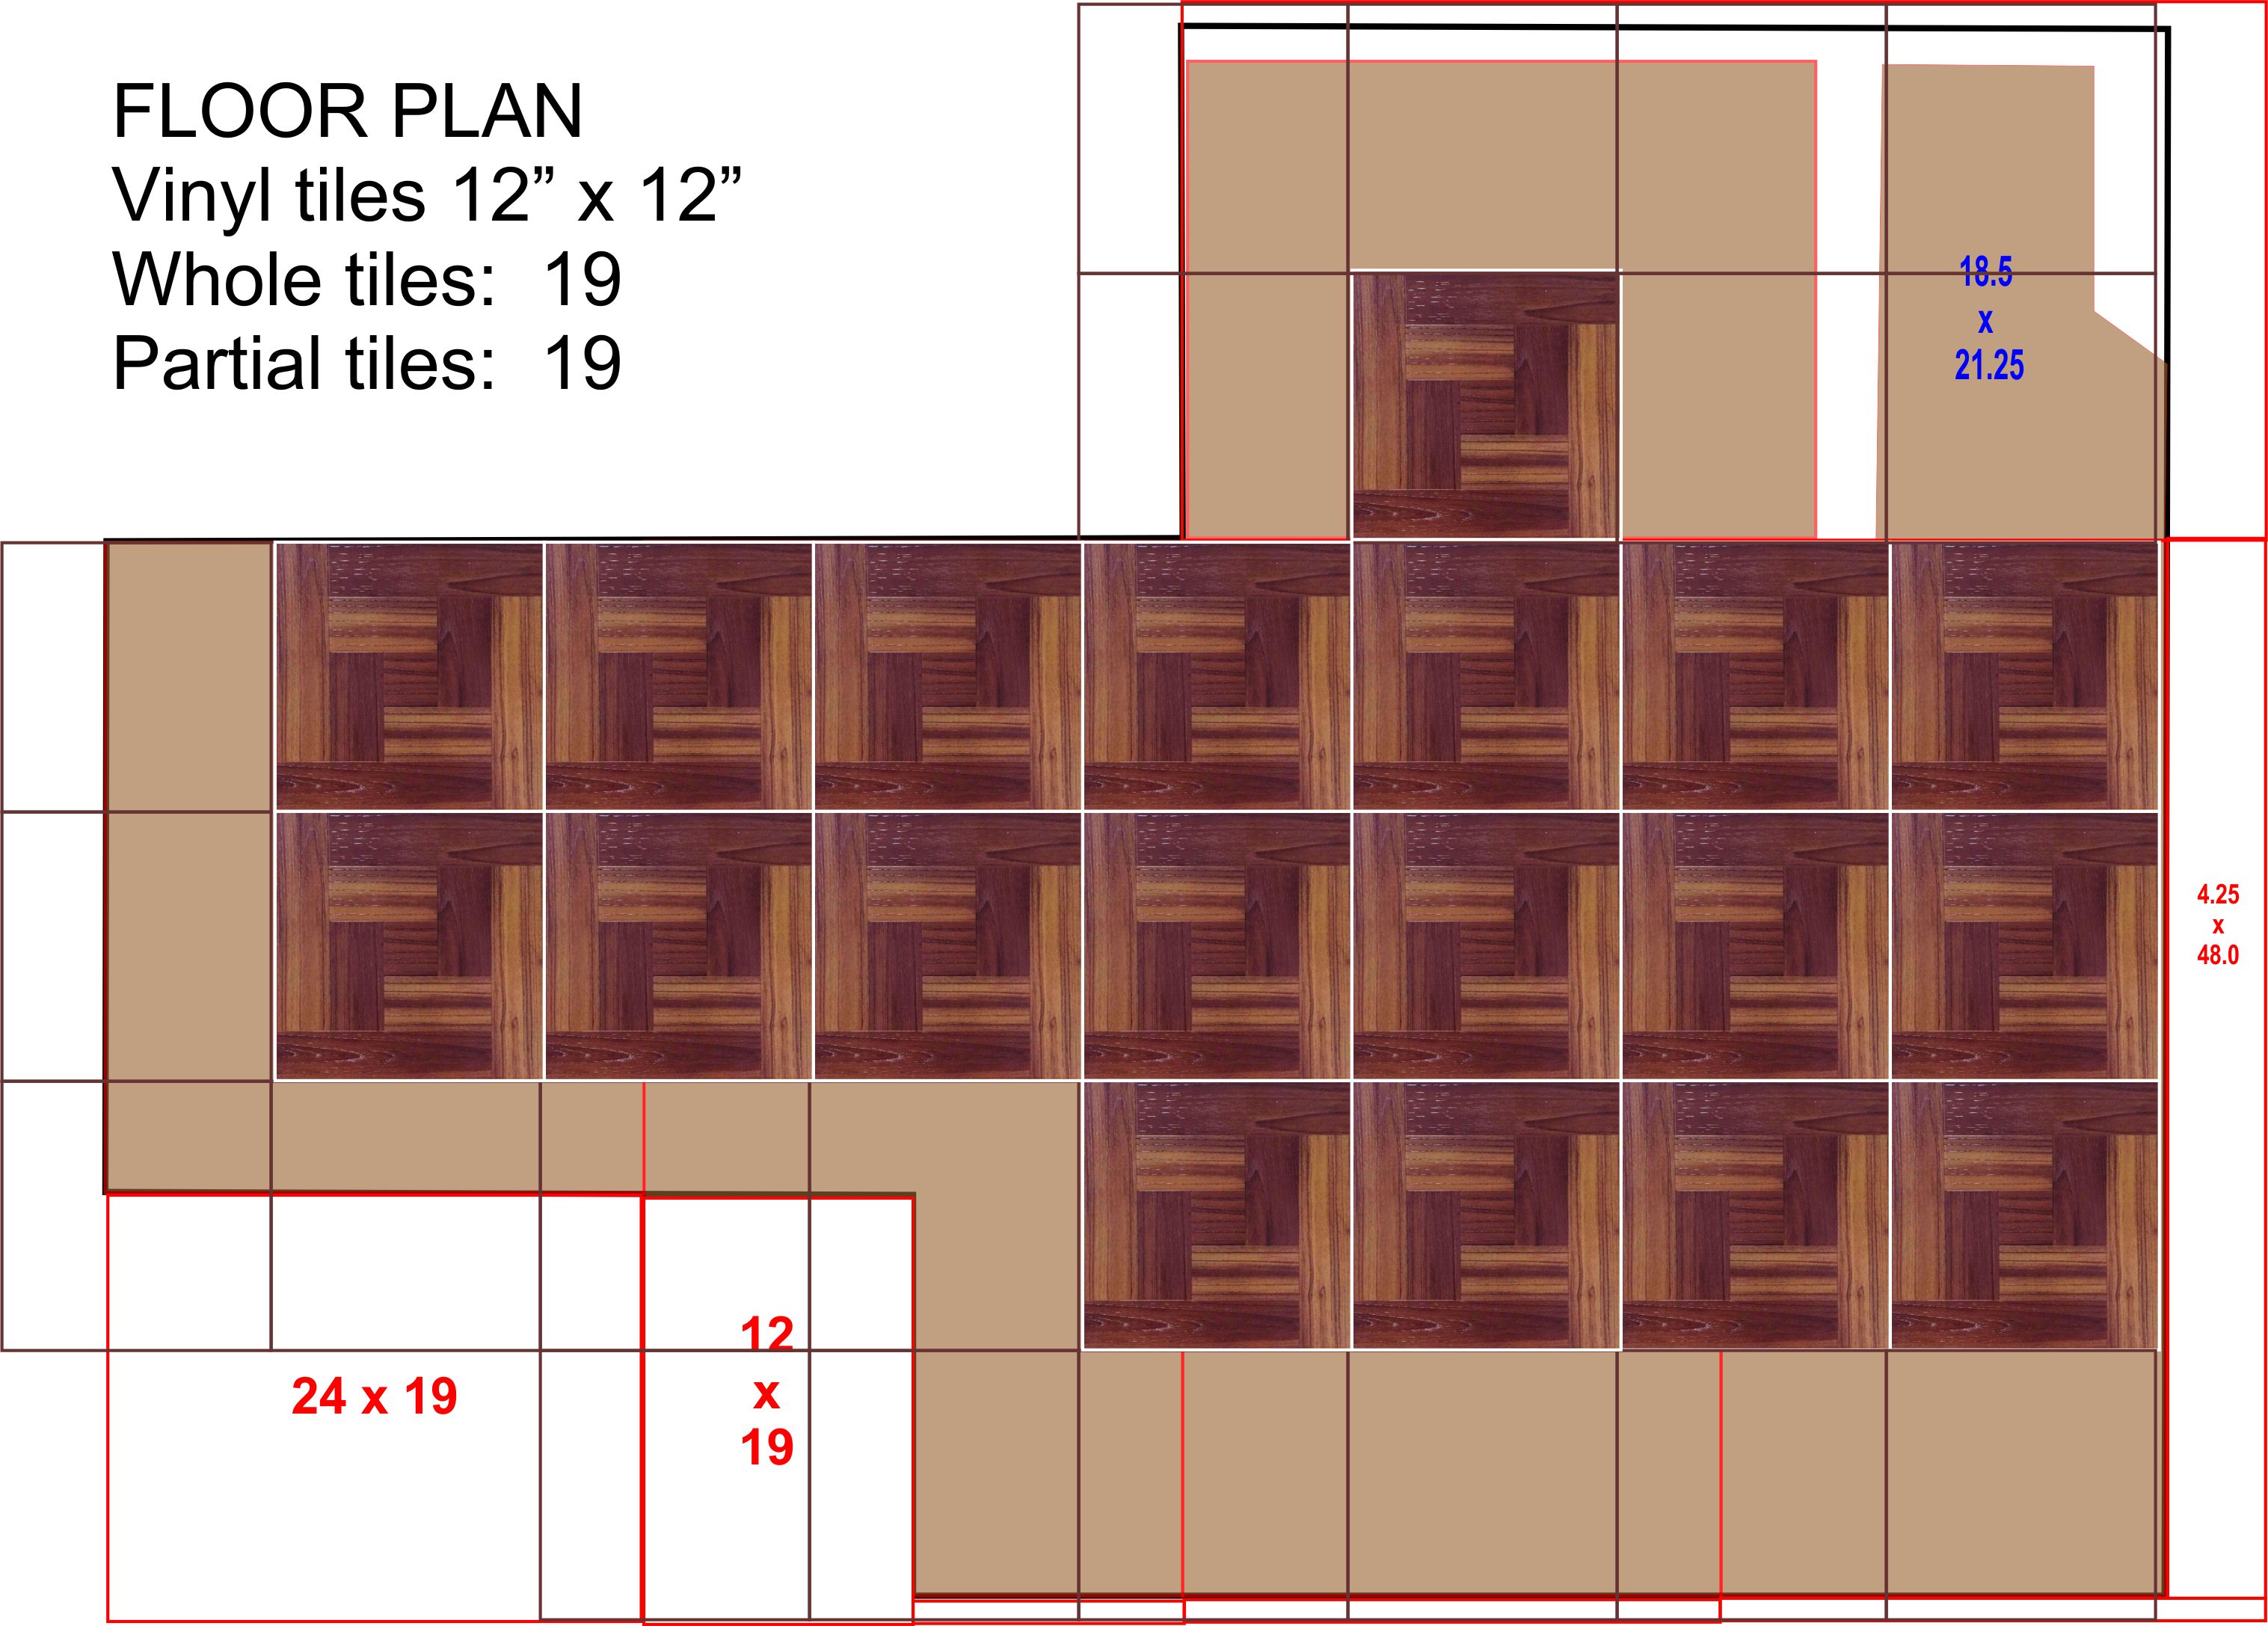
First step was to double check all my measurements. The chart that I used to make such a perfect fit with the rug should match up just right, but I wanted to be sure. You can trim a carpet with a boxcutter if you need to make it fit. Not so with tempered hardboard; I was gonna have to take the power saw to those. Plus, they are too big to fit on the 32” x 18” workspace of the laser, so there would be no easy way out.
The tempered hardboard (TH) is an “extra” step in itself, probably. There is already a ¾” plywood subfloor, as you undoubtedly remember from Chapter 8 or so. It’s sufficiently flat, even at the tongue-in-groove seams, but it’s not especially smooth and TrafficMASTER specifies a smooth surface for best application of their tiles.
Well, TH is smooth as you please on one side and will screw securely onto the plywood. I deemed it a top-notch idea and well worth the effort it would require.
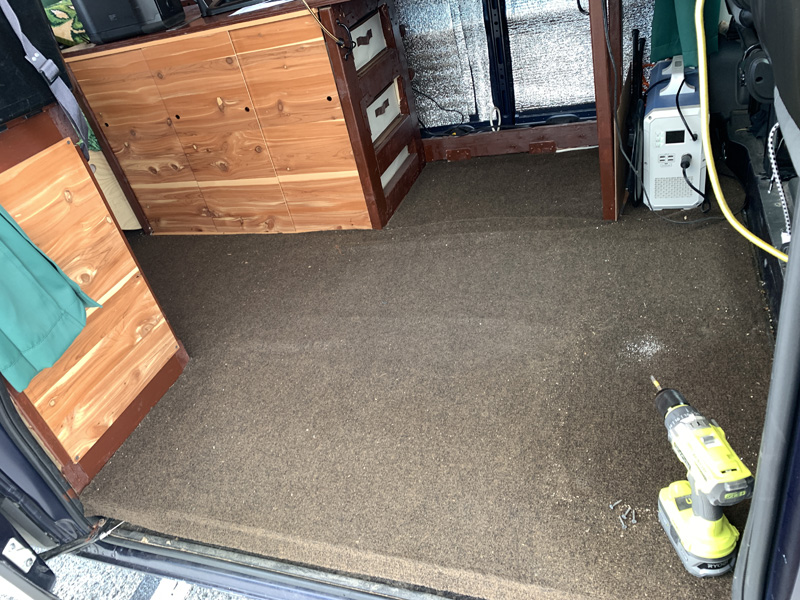
Anyway, before anything could go in, the rug had to come out. And before that could happen, everything on the floor had to move off, up, or out: desk chair, Eco Flow Delta solar generator, Alpicool fridge, spare cooler, and the drawers on the front side of the bed. I left the Maxoak Bluetti solar generator on its floor spot behind the driver seat, resolving to do that little space another time. This was a hot Saturday afternoon on Memorial Day weekend, and I definitely needed those DC-powered fans blowin’ to get me through the task.
Next, remove the cheap brown rug. It was never intended as The Answer, but it had done an excellent job of filling the gap. As I removed screw after screw – about 30 in all – I found myself being impressed by the quality installation I had done. I was going to have to do a pretty nice job with this tile to justify 86-ing the rug.
This brown rug never got wet, but, man, you should have seen how much dirt was under it! Took a right good sweeping to clean it all out.
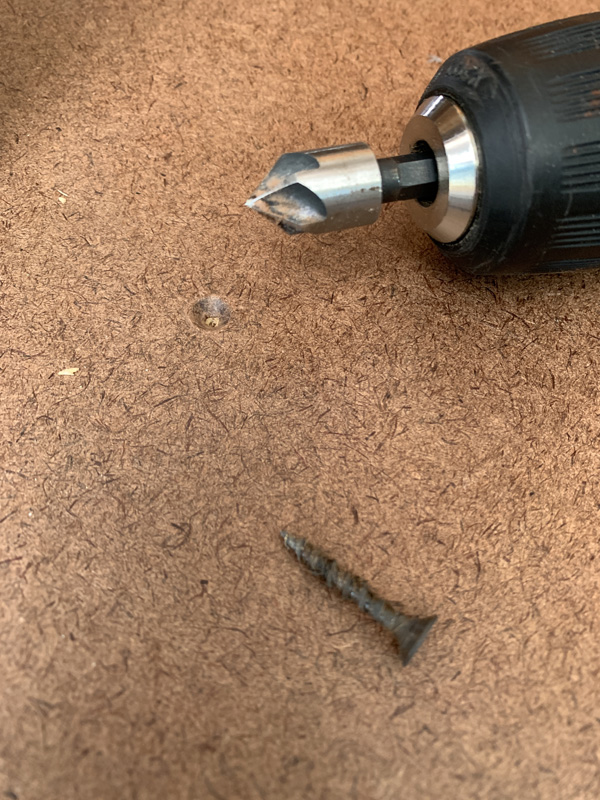
So, yeah. I ran into a little stumbling block when I started to install the TH. The ¾” drywall screws I was re-using (the same ones that had been holding the rug in place) were bugle-head screws. These are flat on the top and fluted from the shaft to the underside of the head. Because of the flute, the screws were not sinking in flush with the firm surface of the hardboard. That looked like it would be a problem under the vinyl tile.
But my second favorite never-knew-it-existed
tool – the little countersink attachment for my
drill – saved the day.
It created tidy sloped circular holes
that the bugle-head fit into perfectly.
I used about half of the screws, mainly concerning myself with where the panels would meet, and the corners. All 5 of the panels needed to be trimmed to some degree: the back one nearly in twain, the front along the full length, the two middle ones barely at all, and the one under the desk cut to pieces.
Why wouldn’t you start along a wall? It would eliminate at least one place where you’d have to trim the tiles to fit. Maybe a non-straight wall would mess up your whole floor?
One key consideration here, though, was the location of the seams between the panels. I wanted to be sure that the seams between the tiles would not line up with them. That just seemed (haha, seemed, get it?) to be inviting a separation problem. The tiles needed to bridge those underlying seams.
The 24” panel at the back would match two 12” tiles way too closely. The front panel, being 19.75” wide would work much better.
Hence, I chose the front near the driver seat as
my starting point, giving myself a straight line
back to the bed, and another towards the sliding
door. From
those row
I didn’t dread this part. It seemed simple enough: measure the space, mark the tile, cut it with a boxcutter and a straight edge, and stick the bastid in place. But my pace was going to slow waaaaaay dowwwwn. Oh well, ‘twas what ‘twas, Buzz.
There were a few spots where my furniture construction was not as spot-on-accurate as I would have liked, so some slivers also had to be cut to cover narrow gaps along the front of the dresser. Other than that, it went down without a fight. I even got ambitious and tiled the space under the bed where the shelves are (not shown on chart).
I gotta say that the TrafficMASTER tiles themselves were a breeze to work with. The backing peeled off easily, and the adhesive stuck fast right away. I had one mess-up where I had to pull the tile back up; it came grudgingly, bending but not breaking.
I like this stuff. I doubt I’ll ever do another floor, but if I do …
So, almost done. Not quite. A little more defense against demon water was in order. I had almost a full can of glossy finish polyurethane left over from the countertops and walls and cabinets. Just a little bit o’ that stuff goes a long fricking way.
Using a 4” sponge brush, it only took about 15 minutes to do the first coat. Only 32 square feet of smooth floor, y’know? I checked it about two hours later and it was dry, so I put down a second coat. That took about 10 minutes. The first coat was brushed back-to-front, so I did the second one side-to side. That’s how it works when laminating canvas prints, so it seemed logical here.
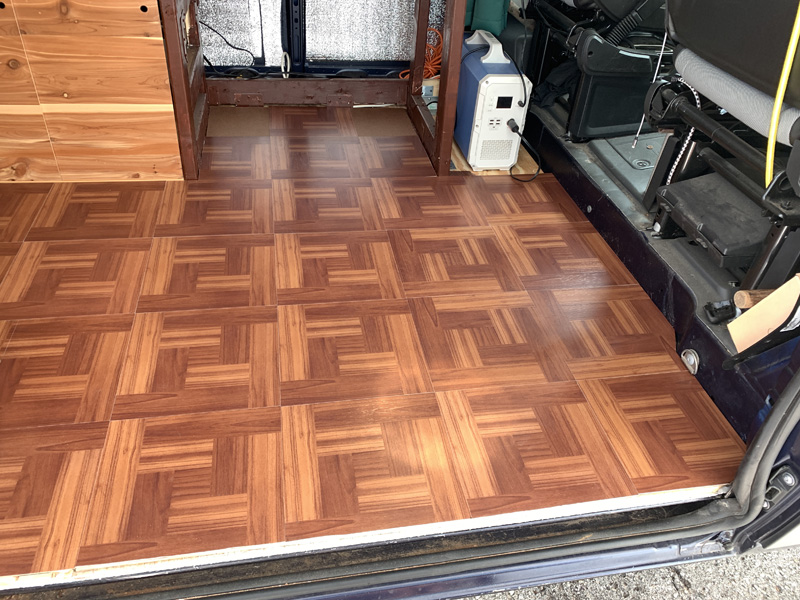
Man, that floor freakin’ shines now. I might do a couple more coats! =)
The only place I did use some was on the 52” long lip at the side door. Before I had even finished half the floor, I had gashed my shin in that exposed edge. Actually, I bought a stick of pine moulding for that area. The wood has a slightly rounder corner than the plastic ones do. I’m sure that will help; I just know I’ll be banging my shin on that a lot.
That lip is the one place that I regret having to pull up the carpet. I had that rug wrapped around tight and snug under the plywood sub-floor: totally professional install.
So, hmmm. What’s the problem?
I love the cedar cabinet doors, and I love the Red Oak Parquet tiles. Juxtaposed, though, ehhhhh, yeah, I still like ‘em, but…
Well, I kinda get the plaid-pants-with-striped-shirt vibe. Never once crossed my mind until I stood back and looked at the finished floor. I’ll just have to get used to it. Certainly not changing either at this point. =)
***** ADDENDUM *****
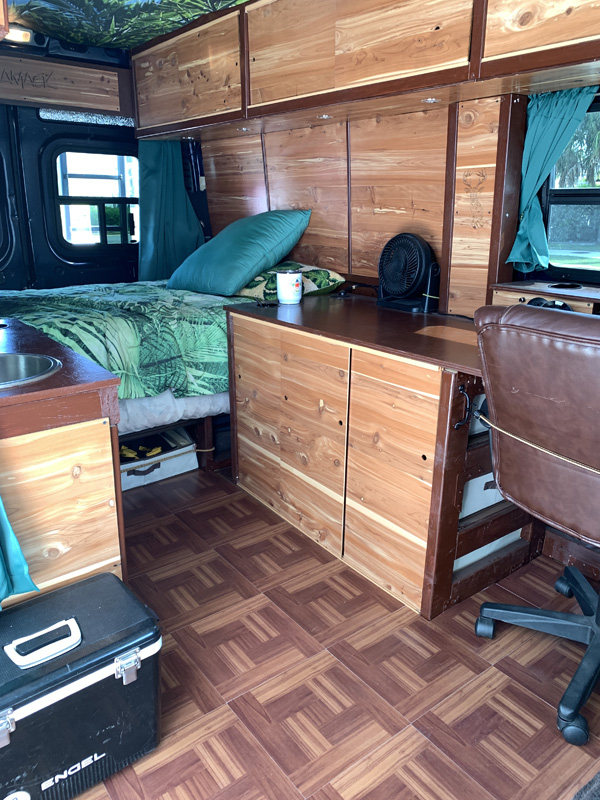
[I have no work-in-progress pictures for this section, so I'll toss in random unrelated pics just to keep you visually sated as you read.]
But, alas, trouble was lurking. I had taken two gambles, really, and neither one of them paid off in the end.
The square tiles had come with a temperature warning, admonishing the user – i.e., me – to avoid installing them in places that might exceed 90˚. Well, I knew damn well that the belly of Blue Maxx heated up far beyond that when left parked and closed up tight on a summer day. This was especially true since I’d be parking him in the direct sunshine -- to maximize solar consumption -- instead of in the cooling shade. So, that part of the floor failure was no huge surprise. When the back corner of a tile near the dresser raised slightly upward, I groaned, surmising that trouble was imminent. I pressed it down firmly with my foot, commanded “stay!” and proclaimed the problem solved.
Easy, yes?
Well, no. It didn’t stay long. A few days later, the same corner had risen up again in defiance. I repeated my solution, reasoning that I had not issued my command with enough conviction the first time.
But, you know what? That didn’t work either. Then, the corner of another tile a couple of squares towards the door, also rose up.
At that point, I knew verbal decrees would not suffice. With tube of adhesive in hand, I gently peeled up the offending corner to apply the repair, when I noticed that the underside of the tile seemed ... wet. Hmmmm.
The adhesive seemed to be still semi-liquid. Given the hot spell we were in, and mindful of the 90-degree threshold warning, that did not seem absurd. But the floor had been in place for a year; you would think it would have dried up by now. And a dab of glue didn’t seem like a viable solution anymore.
I had a half-case of tiles leftover from the install, so I figured I would just replace the two rebellious squares and hope that set an example for the rest of them.
So, I peeled up the tile. It seemed wetter than just soggy adhesive would be, not that I know what soggy tile adhesive should look like. The tempered hardboard (TH) underneath looked somewhat saturated.
Since
I
had so much extra tile, I said “screw it” and
ripped up the one next to it, and the one next
to that. I could see a dark streak on
the TH layer angling right for the foot
pump.
Dammmmmmn. The freaking pump leaked. (That had been the second gamble. This was a bad O-for-2.)
The tiles had not been rebelling. It was not an uprising. It was a cry for help. I felt bad for about a thousandth of a millisecond. My presumption of intent was, after all, just an absurd projection of prescience from my overactive imagination and nobody would ever know about it anyway, right? Ahem.
So, I resolved myself that I had not just one Step to redo, but two full ones.
Before I could launch a redo, though, I needed to get to the undo.
I ripped up the tiles, discouraged at the moisture, but VERY glad that I had found it now. The TH was damn soggy. It had to go as well.
It was a shame to toss out all the coolo parquet, but it was not expensive, so no big whoop.
Likewise with the TH. That stuff is cheeeeap, so I unwound all the screws that held it down and tossed it in the dumpster without remorse. I was glad that I had screwed it in instead of nailing it or gluing it down.
And I was down to bare subfloor, just like 18 months before, but it was now a wet subfloor. I scrubbed it hard with towels, then ran full-blast electric fans across it for most of the next 36 hours to make sure it was good and dry.
I got lucky, I guess, in that the leak had apparently not been strong enough or been going on long enough to get the subfloor really wet. The tempered hardboard, being very porous on its underside seemed to have acted sponge-ish and soaked up a goodly share of the water.
Had
the
tile not peeled up when it did, I might have had
a HUGE project on my hands.
So, well, thank you, tile. You
sacrificed yourself for the greater good.
How noble.
I
needed a floor plan. No, not that
kind. A plan for how to fix the floor.
Meanwhile, I disconnected the hoses from the foot pump and unfastened the flawed item from the subfloor. Almost all of the plumbing was going to have to be done over, but this time with a DC-powered water pump mounted somewhere under the sink and wired somewhere above the ceiling. Oh yay, good times ahead.
I needed a plan for that too. But that’s another chapter (see Sink).
The floor came first, and it fought me hard.
I decided to do what I had thoroughly shunned at first: prep and stain the plywood. I had not done a damn thing to it originally since it was going to be out of sight and protected under the parquet and TH. Now, a lot of work was staring me in the face.
First thing was to sand it. I did not have a sander, so that's a bad start right there. But I bought a sanding wheel for my drill and a slew of sandpaper disks — in a variety of grits — and thought that would be enough.
As it turned out, I should have bought (or at least rented) a sander. The wheel worked, but on really small areas at a time. It was slowwww progress, and I was less meticulous than I should have been since I figured the stain would obscure the dark areas anyway.
The cognac stain I used in the cabinets turned out to be opaque (more like paint, I thought), so I figured this would be the case on the floor as well. I should have educated myself better about stains.
I bought a “redwood tint” semi-transparent stain, that I thought sounded promising. I figured it would hide the discolorations and still show the grain.
Wrong. Way wrong. This slop was bad news. The light parts of the plywood looked pink – ya, real pink! – and the dark parts looked maroon. I tried a second coat, hoping it would darken, but it just upped the contrast and saturation more. It was hideous.
It’s never a happy thing to be on your hands and knees sanding the finish off a floor, but I was all too glad to spend my Sunday burning through several more sandpaper disks in order to eradicate this blunder. I could not get this stuff removed soon enough.
So, I decided to just go darrrrk, deeeep darrrrk. And on Home Depot’s website, I found a really dark reddish-brown -- almost black, but not quite – that supposedly dried in 90 minutes, and it was ready for the second coat in 2 hours. Great. Bring it on.
There was a catch, though. Ya, oops. This was furniture stain. It did not say “Do Not Use On Floors, Asshole!” but it should have. I thought, hey, wood is wood, yes? How does the stain know?
Well, it applied pretty fast, but felt weirdly sticky as it did. I waited my two hours, thought it felt tacky, so I waited a third hour, then a fourth. WTF, stain? Eventually, I shrugged and began doing a second coat. Bad mistake.
Right away, the second coat started mucking up the first. Dammmn. So, OK, yeah, I used it on a floor. But whattup with those 90-minute claims, hmmm?
This stuff had to go. Another afternoon, more sanding wheels. At least it was not-dry enough that I could scrub off the majority of it with crappy old throw-away towels and save myself some really sloppy sanding. But I still had to eliminate the residue.
I sanded enough to make the plywood a uniform shade of ugly, but at least it was dry.
So, the whole weekend was trashed. About eight hours on my knees, bent over, leaning on the sanding wheel. I had aches. I hate aches.
I went to work early on Monday, determined to get this done. I used the same stain – I did like the dark look a lot – but I figured I’d let it dry all damn day and stick with just the one coat.
It went on well, and it looked good! And it’s only 32 square feet of surface, so the application was quick.
It was a breezy day, so I moved the van to the side of the building, left the slider door open, and had two electric fans blowing down on and across it from the sink and the front floor (i.e., between the seats).
I checked on it around 11 and it was still a bit tacky, but definitely well on its way to the desired result.
Work was pretty busy, so BM drifted out of my mind for an hour or so more until my attention was grabbed by a loud roaring noise outside the window, where the van was parked. OH, NO! It was the landscaping douchebag with his leaf blower!!
I raced outside, but sure enough, shithead had just walked by the open side door, kicking up a wall of dust on all sides of him. I rushed by him and looked in the van. Wall to wall dust all over – and STUCK TO – the tacky floor.
Oh my God, I let him have it. I’ll spare you the details, but the next two hours with him, his supervisor, and the company owner (whom the supervisor called in) were unpleasant.
Long story short: another damn sanding! Oh my gawwwd, what a beating.
This time, I resolved to sand this like I was in a sanding championship. I took Tuesday off from work and spent about six hours getting every damn dark spot out, using finer and finer grit till the whole floor was slide-on-it-in-socks smooth.
It looked awesome. And the ¾” thickness was probably down to 5/8” or less by now. Ha.
But ya can’t leave it naked like that. Back to HD. This time, I located a Red Mahogany stain that seemed perfect. Where the hell was this all those other times I went searching??
I put it down and it looked excellent. It dried fast too. Second coat, even better. I sealed it all under triple-thick glossy polyurethane and man, oh man, I finally had me a FLOOR!
Maintaining it is easy too. I got a pouch of Pledge Wipes and it fakes me about ten minutes to give it a full wipe-and-shine. Mann, is it smooth and slippery after that! In clean socks, I am like Tom Cruise in Risky Business. It's almost too smooth. I've almost taken a tumble a few times. Ha.
I
might even give it another coat of 3xPoly in
6-12 months or so.
Maybe I should have done it this way in the first place, hm? Ya, next time… |