THE
SINK
Heng’s
13”
diameter drop-in stainless steel sink - $37
EverFlow
Junior
Duo Strainer - $9
EZ-FLO 10796LF Single Basin Faucet - $20
Whale
GP4618
Manual Freshwater Galley Foot Pump - $48
Ozark
Trail
Desert Patrol 6-Gallon Water Jugs - $37 (for
2)
Home
Depot
5-gallon pail with cover - $5
Flexible
1”
clear hose, 10 feet - $10
Reinforced
2”
hose, 2 feet - $8
Aluminum
Recessed
Drink Holders 3.5” diameter - $28 (for 10)
3”
Recessed
Grommet Outlet with 2 AC Outlets and 2 USB
Ports -- $23.99


Water. All
life on earth depends, directly or indirectly,
on water.
Even fish.
So far, I’ve been a carpenter, an electrician,
an auto body worker, and a painter.
Let’s try plumbing!
How hard can it be, right?
To be fair, this is hardly what would properly
be termed “plumbing.”
Water will be moving from one place
to another through enclosed tubes, so,
technically, it qualifies as plumbing.
It will only move a total of maybe
eight feet from start to end, so no big whoop. But
it’s more plumbing that I’ve ever done before!
In the current configuration, the best
location for a sink is between the bed and the
passenger side sliding door.
A frame of 2x4’s, 33” wide by 18”
deep by 29”
high is a perfect fit.
I keep the depth to a minimum to
preserve precious open floor space.
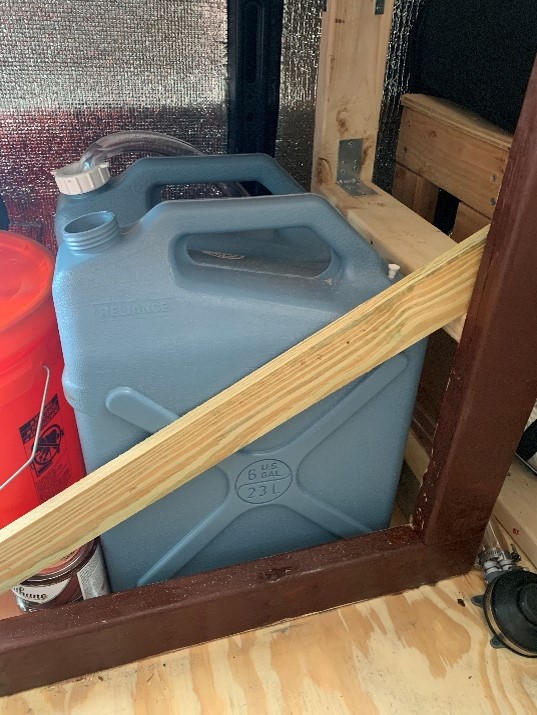
The water jugs will fit snugly in the 15”
between the front and back horizontal studs,
so they won’t slide and tumble around (which
would suck).
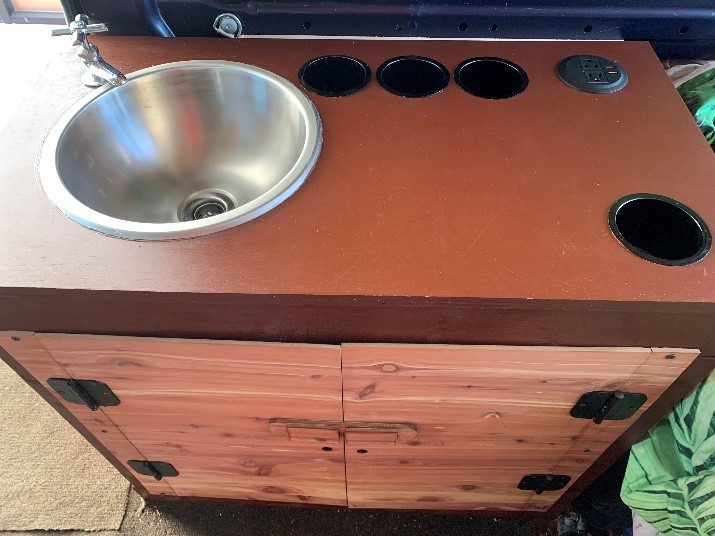
The 18” top leaves plenty of room for the
small 13” round sink.
The simple one-lead faucet fits in
the corner near the door.
As a bonus, I decided to sink (pun intended) a
couple of recessed 3.5” diameter cups through
the countertop.
One would be next to the sink, to
hold, I dunno, toothpaste,  toothbrush,
that kinda stuff.
The other is at the front back
corner, a
perfect drink holder for when I’m fatassing in
bed.
toothbrush,
that kinda stuff.
The other is at the front back
corner, a
perfect drink holder for when I’m fatassing in
bed.
The original plan had this whole assembly
built right up against the wheel well cage
that the bed rests on.
That would provide a lot more
stability, but it would also
create a scrunch for the bedding.
Leaving a 2” (or so) gap there leaves
room for the sheets and comforter(s) to fall
neatly into place.
I’m sure that gap will come in handy
for something slim.
As for the height of the ensemble, 29” sits it
right along the somewhat-recessed bottom of
the “waist” of the van:
that thick horizontal rib below the
window spaces.
And that’s where I started, by attaching a 30”
stud (2x4) to that recessed, flat metal
surface.
There were openings in it, so, just
like with the cabinets above, I opted to bolt
the stud into the frame.
Four 2.5” bolts hold that thing
tight.
That 2x4 is the anchor, not the sink assembly
frame itself.
That came next.
I laid a 33” stud against the anchor
stud and secured it with dual 2.5” screws at 5
places. It’s
not going anywhere.
From there, I laid/stood all the pre-cut wood
to make sure they would all line up correctly
and began attaching them to the floor and to
one another.
I used a crapload of various ZMax
corner braces, securing each with six screws. On
the floor, I used ½” screws because the
plywood is ¾” thick.
For stud-to-stud, I used 1” screws
for greater strength.
Content that the frame was solid, I added the
¾” Sande plywood top.
I had already stained it (cognac, to
match the cabinet trim), so it was a simple
matter of attaching it from underneath with a
few more ZMax’s and ½” screws.
By this time, I had trekked up to Brian’s
Mainland Workshop for multiple reasons, only
one of which was that he knows more about
plumbing than I do.
The other reasons were all much more
fun. =)
 But we did set to the task to knock it out of
the way and give the beer more of a
congratulatory flavor.
A sink requires holes:
in this case, an 11” one for the
drop-in bowl itself, a 1” one for the faucet,
and a few optional mediums.
But we did set to the task to knock it out of
the way and give the beer more of a
congratulatory flavor.
A sink requires holes:
in this case, an 11” one for the
drop-in bowl itself, a 1” one for the faucet,
and a few optional mediums.
I was getting hole happy.
I used the hole saw to cut out the 1”
hole, the four 3.25”-diameter hole saw for my
black aluminum recessed holders, and three
more of the same size within an 11” circle for
the drop-in sink itself.
They served as starting points for
the jigsaw, which did a pretty good job, but
not exactly spot-on the line in places.
The rim covered the roughness anyhow,
so no biggie.
We surrounded the rim with caulk,
inserted the sink, and tucked a bead of clear
silicone around and under the rim.
We had to use Brian’s small Dremel sanding
gizmos to widen the cup holes out to the 3.33”
that they apparently needed.
That took much longer than we
expected, but we were soon able to press/pound
them into place.
Likewise with the faucet hole.
I then decided that a polyurethane coating
(matte finish) on the top of the sink counter
would be dang good idea.
Anything that would deter water from
damaging a plywood sink counter might be
downright useful.
It brushed on easily and dried
astoundingly fast, so I applied a second coat. I
chose matte finish to better blend with the
bare cedar.
We then filled up the 6-gallon water jugs and
let them stand in the sunshine for a couple of
hours to make sure there were no pinhole
leaks. They
passed the test, so I hefted them back into
the van (filled, they weigh 48 pounds each). They
are a perfect fit; I have no worry about them
tipping or toppling.
We clamped 5’ of the 1” hose to the faucet and
inserted the other 5’ into the neck of the
freshwater tank.
I was ready to clamp the free ends of
both to the foot pump and close the circuit,
but… I couldn’t find the pump!
I
knew I had packed the damn thing, but it was
nowhere to be found.
Grrrrr.
Where
did it go??
The pump presented another problem too:
where should it go?
The most practical location would be
at the front of the little space between the
sink box and the wheel well box.
It would be easy to run the hoses
through the open side, and I would not have to
cut through any of the framing 2x4s or to
interfere with the doors.
The downside to that was that the sink was on
the left side of the box and the pump would be
on the 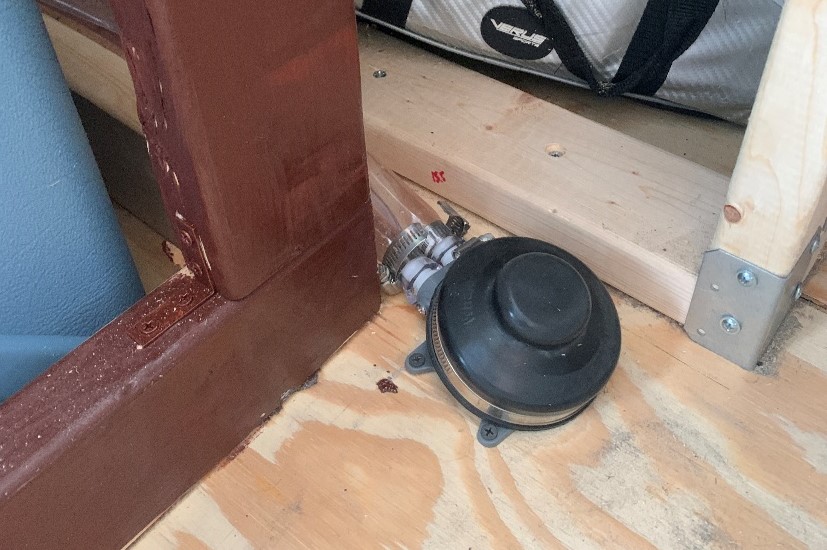 right,
a whole 33” away.
I have long legs, so it shouldn’t
really be an issue, just a tad awkward.
right,
a whole 33” away.
I have long legs, so it shouldn’t
really be an issue, just a tad awkward.
But, anyway, with no pump to attach, we
proclaimed ourselves finished and hit the
fridge on the way to the pool.
(Well, I found the pump after I got back home. I
had packed it, but it had tumbled out of the
box that I expected it to be in.
I found it when I was clearing out
the other side to build the desk/dresser.)
The 1” hose I bought was not especially
flexible, and it was also quite bit larger
than the post on the pump itself.
My screw-clamps would only close it
so far with the flathead screwdriver.
Fortunately, I had a 5/16” nut driver
with which I could grind that thing down to
water-tight status.
I tested it before I secured it to
the floor.
It worked great!
I can’t exactly call it “running
water”; it’s not like the smooth flow of a
siphon, but you get a good sploosh out of each
stepdown.
But the water has to go somewhere when yer
done with it, duddinit?
I bought some pretty thick, rigid
reinforced hose – only about 4 feet of it –
with the intention of somehow securing it
to/through the lid of the 5-gallon bucket,
then maybe add a spigot and hose down though
the floor to drain it without having to haul
the bucket out.
That seemed like a real lot of effort though,
so I held off till I was more in the mood and
started working on the driver side desk.
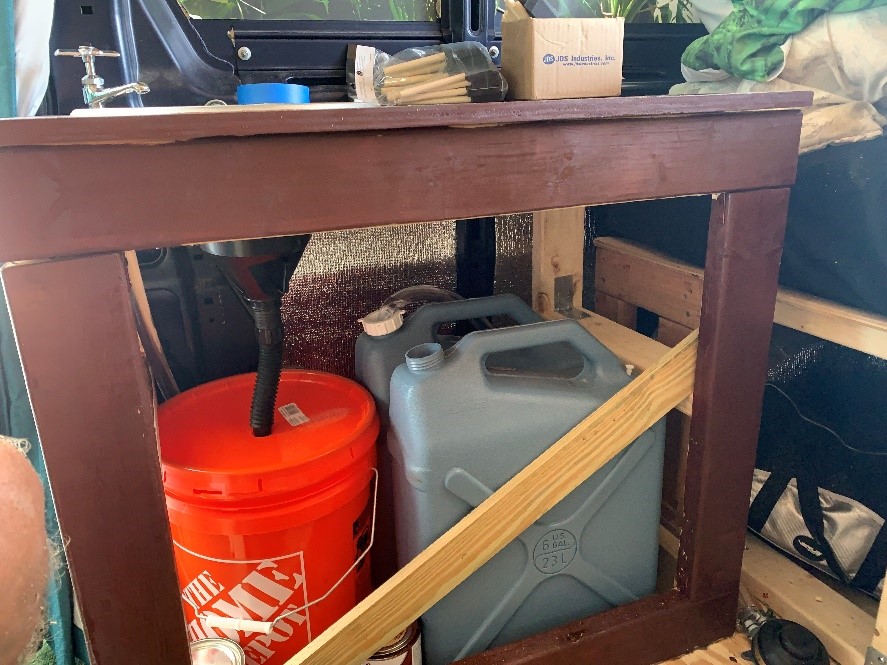
Meanwhile, I was in AutoZone and saw this long
black funnel with a deep and reasonably wide
bowl and a hard-plastic, semi-flexible hose. Heyyy,
wait a tick!
That just might be my so-lution.
I made the impulse buy and took it out show
Maxx. There
was a bunch of random crap in the 5-gallon
orange Home Depot bucket, so I pulled it all
out and put on the lid.
It sealed really tight.
My razor cutter did a nice job of
slicing a reasonably round hole in the center
recess of the lid.
It was just slightly narrower than
the end of the hose, but just big enough that
I could jam the hose through the non-rigid
plastic.
The funnel stood up perfectly under the
drain with no tape or fasteners of any kind
and it was pretty much watertight.
Done!
Ha!
 Maybe I’ll add the drain hose through the
floor some day.
We’ll see how much I actually use the
sink and how much of an issue it is to dump
the gray water.
Maybe I’ll add the drain hose through the
floor some day.
We’ll see how much I actually use the
sink and how much of an issue it is to dump
the gray water.
I’m also thinking about doing a 2-gallon gas
can instead of the orange bucket.
It would give me more space, and it
would be a lot easier to take out and dump. We
shall see.
I like it as is.
If I start liking it less, I might
make some changes.
There was still one concern.
I worried that the tall 6-gallon
water jugs might topple during a sudden sharp
turn. A
full jug would lurch almost 50 pounds against
those thin doors, and I did not see that
ending well.
I looked at a 36” strap of 1x3 that I had
lying nearby and thought, “That dog will
hunt.” I
laid it in diagonally -- without fastening it
to anything -- and it was held nicely in place
by the frame and the jug itself.
I just lift it out to remove the
jugs. Perfecto.
Last thing to do was to enclose the frame. Originally,
I thought that sliding doors, like on the
cabinets above, would work, but – two things –
first, they wouldn’t slide open wide enough to
remove the 6-gallon jugs easily (though I
could just remove the doors too, I reckon),
and second, I could easily picture destroying
that bottom track with 48-pounds of water
container when I’m trying to put one of those
suckers back in.
 So, hinges it would be!
The side panel next to the sliding van door
was a simple slab of ¼” cedar plywood screwed
into the 2x4’s.
The doors would be the same material,
but I was concerned about warping, so I cut up
a few of my 1x3’s and created a frame for the
inside to give the panel some rigidity.
They also give me something to screw
my door latch into, though I hadn’t yet
decided what that would be.
I chose black hinges, in a rather traditional
style. I
didn’t think gold looked good with cedar and
had decided long ago that Maxx would be
gold-less.
I considered silver, to match the
puck lights, but I didn’t see any silver ones
at HD that day.
Anyway, the black hinges would
complement the black drink holders, as well as
the black power outlets that I’d be
installing.
Rather than try to recess the doors, which I
felt was a fast track to failure, I laser-cut
a 1”-wide cedar strip for each of the front
upright 2x4’s so the door would sit flush with
it. To
assure that all four pieces be aligned
properly, I used blue painter’s tape to hold
those strips and the two doors exactly where I
wanted them.
With them stuck like that, it was
cake to screw and hinge them into their
correct positions on the first try.
The right-hand stayed in place well, but the
left-hand door swung way too freely.
A latch of some kind was going to be
needed. I
thought about some kind of magnet, but no
matter how I looked at it, I was going to have
to sink some screws from the inside out, and
with just a quarter inch of depth, it just
wasn’t going to work.
I decided on a slide bolt in the middle. It
didn’t work well at all.
Too
loose. I’m
sure it was my bad, but I deemed it not worth
a re-try.
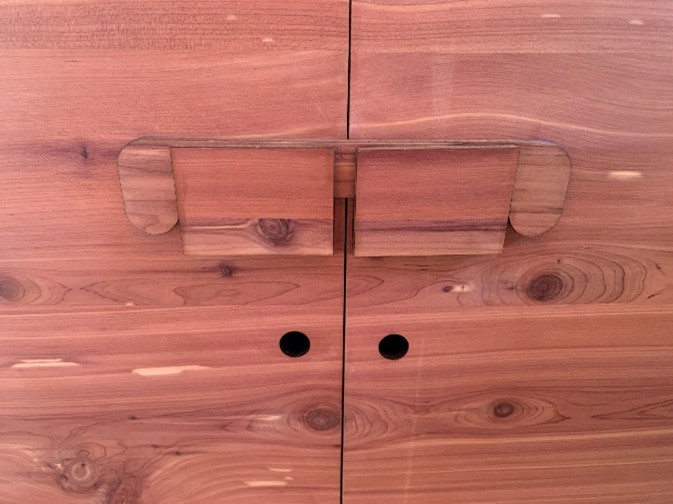 So, I went to my go-to device, my laser, and
cut two 2” x 1” rectangles, two 2” x 2”
squares, and one 6” x 1” dog-bone shaped
piece. I
use strong 2-sided tape to secure the
rectangles to the doors, more tape to attach
the squares to the rectangles, bottom-aligned. That
left a 1” high gap, exactly ¼” deep, into
which the dog-bone fit perfectly.
The curved outer ends hold it snugly
in place.
I lift up the bone and the doors open. And
no screws to mess with.
[Note:
after a couple of weeks, the tape
began to weaken so I screwed the rectangles
in.]
So, I went to my go-to device, my laser, and
cut two 2” x 1” rectangles, two 2” x 2”
squares, and one 6” x 1” dog-bone shaped
piece. I
use strong 2-sided tape to secure the
rectangles to the doors, more tape to attach
the squares to the rectangles, bottom-aligned. That
left a 1” high gap, exactly ¼” deep, into
which the dog-bone fit perfectly.
The curved outer ends hold it snugly
in place.
I lift up the bone and the doors open. And
no screws to mess with.
[Note:
after a couple of weeks, the tape
began to weaken so I screwed the rectangles
in.]
Then one more idea hit me.
I already a DC/USB outlet with dimmer
switch on a temporary panel under the
cabinets, and I fully intended to keep that
when I finalized that wall, but I did not have
an AC power on this side of the van.
There was a long extension cord that
I had snaked through the upper recesses, over
the back doors and down by the bed.
It was functional but laaaame.
I had been looking for some kind of outlets to
put on the desk, whenever I got around to
that, and I found a really cool drop-in
grommet outlet with 2ACs and 2 USBs.
What a bonanza.

And I got to use the hole saw again!
Woohoo!
Love that thing!
So, right beside the bedside drink holder, I
cut another 3.25 hole, and dropped the outlet
into place.
It’s actually not much more than a
specialized outlet on the end of a 6’
extension cord.
I stashed my existing e-cord within
the back corner panels and plugged this into
it.
Zingo. We
have AC power bedside.
And running water just an arm’s
length away.
Sweet.
ADDENDUM
Electric
Water
FlowMax
Water
Pump - $71.95
CAMPMAX Water Container with Spigot, 5 Gallon - $40.99
Inchant Single Lever Flexible Pull Out Kitchen Water Tap -
$20.99
Everbilt
2 in. x 10 ft. Polyethylene Discharge Hose -
$19.24
½”
clear
plastic hoses and worm gear hose clamps
Gorilla
waterproof
tape
Dicor
Lap
Sealant – leftover from Step 1 (!)
Like
I
said, I took a couple of gambles that bonked
in this Project.
The tile floor was the first. You
may have just read about that (if not,
it’s the previous chapter, called “The
Non-Tile Floor”).
The second gamble was the foot pump
for the
sink. The
failure here was much more of
a surprise.
The device had been chosen
for its simplicity because a more
complicated one would bring a higher risk of
leaks.
Oh well, so much for simple.
Actually,
this
failure was revealed only during my
examination of the first
failure. Both
gambles had been attempts to take a simple
way out and avoid more arduous
tasks. Not an unreasonable wish,
right? Right??
Maybe
it
was where the pump had been
installed. Maybe it was how it
had
been installed. Maybe it was how
hard I had to step on it to get a
worthwhile gush. Maybe it was all
of the above, or none of the
above, or A and C but not B, or whateverrrrr
…. but it leaked.
It
wasn’t
a gusher, mind you. Oh no,
nothing so brazen. This
was insidious: a trickle, totally
undetectable without minute
scrutiny. No water appeared on
the upper side of the
pump. No water appeared on the
top side of the tiles. It
seeped out in the darkness under the hose
clamp and oozed its way between the sub-floor plywood and the layer
of tempered hardboard (TH) that I had stuck
the tiles to.
I
got
lucky, I guess, in that the leak had
apparently not been strong enough or been
going on long enough to get the subfloor
really wet.
Also, the tempered hardboard, being
very
porous on its underside seemed to have acted
almost like a sponge and soaked up
a goodly share of the water.
The TH was
far more saturated than the surface of the
plywood was.
Very fortunate indeed to have found
it when I
did. [If
you just read “The Non-Tile Floor”,
that paragraph probably seems redundant, but
if you didn’t, it is
necessary exposition.]
But,
clearly,
that pump was a goner.
This was
going to be a MAJOR change.
When that
manual (or would “pedal” be a better word, manual
referring to things of
the hand, and pedal relating to
feet, as in bipedal?) pump first
worked, I was elated that I had saved myself
all that construction and wiring
that an electric water pump would have
involved.
Well,
not
so elated now are ya, Ricko?
Ya lazy
bastid.
Bah.
Lazy,
you
say, Mr. Narrator?
Check this out.
There
was
indeed a lesson learned from the leaky pump
episode.
Before I took any steps towards the
new
arrangement, I took everything out of the
cabinet.
The sink structure has the four
vertical
studs on the corners, of course, but it also
has studs lying horizontally all
the way around the bottom.
The 2x4s are
standing “the tall way”, creating a 3.5”
high wall around the base.
The wood is secured down with
numerous ZMax
brackets.
Within
that
“wall” the floor is raw plywood.
Given recent developments, I thought
it would be a good idea to give
that wood a little protection from water.
Good idea, yes?
Home
Depot
had not only the clear glossy polyureythane
that I had used on the cedar
and the countertops, but they had a Triple
Thick clear glossy version as
well! I
was all over that stuff.
But
before
I brushed any of that down, I took the roll
of 2” Gorilla Waterproof
tape that I had also purchased and sealed
off the seams between floor and
horizontal studs, effectively creating a
basin.
Then, with plenty of tape left, I
laid down strips from left to right all
the way across the bottom.
Then
I
did the same from front to back.
Then, I brushed down a generous layer of
that 3X Poly all over the cabinet floor.
I also brushed it all over the inner
walls and upright studs, on the
support blank for the pump, the underside of
the sink, every damn place I could
reach.
Only
after
that was all dry did I even begin to think
about placing anything back
into the cabinet.
OK,
that
was all good, but I still didn’t know a dang
thang about water pumps.
So, first things first: check
YouTube for how-to advice.
Well,
it
only took a couple of vids before I found a
very good one, specifically for
the RV-friendly Flow-Max Water Pump.
It
was hosted by a young woman, and she gave a
very clear step-by-step
install.
I was able to see how to run
the hoses and how to connect the wires.
I
obviously
had some work ahead of me, but it no longer
daunted me.
There is nothing misogynist in this
comment,
but I found myself saying, “Well, if she
can do it, I can do it.”
This
was
pretty much my mantra throughout the
Project.
Every video that struck the chord
with me –
that is, left me with a firm belief that I
actually had the grasp that I needed
for a particular task – was saluted with a
“If you can do that, I
can do that” response.
So,
I
purchased the Flow-Max on ‘zon, and, while I
was at it, I tacked on a couple
more upgrades.
 First, I got a more useful freshwater tank.
The military style 6-gallon plastic
can
(which had also been suggested by the foot
pump people) got replaced by a
translucent 5-gallon tank with better lids.
First, I got a more useful freshwater tank.
The military style 6-gallon plastic
can
(which had also been suggested by the foot
pump people) got replaced by a
translucent 5-gallon tank with better lids.
It
holds
less water, yes, but it was the translucence
that I was after.
With the opaque gray plastic, there
was no
way to see when your reservoir was getting
low.
This new one, though, was just a tad
too long to sit flat within the
baseboards of the sink cabinet.
But I
quickly found a way to turn that to my
advantage.
I
propped up the rear end on top of the 2x4
stud along the back.
This tilted everything forward,
including the
water itself, but not quite far enough for
the top front of the tank to
interfere with the closing of the cabinet.
And, that puts the wide refill
opening in the easiest place
possible.
Then, I just made sure that
the end of the outflow hose sat right down
there at the lowest point of the
tank where it could suck right up to the
very last ounces.
For
the
tank that would hold the gray water (i.e.,
the drainage from the sink), I
just went with a lidded orange Home Depot
5-gallon pail.
I cut a hole near the center of the
lid and
positioned the 2” rigid drain hose into it.
That
became
a MAJOR inconvenience when gray-dumping time
came around.
I could not remove the lid or the
bucket
without unclamping the hose, which required
the power-screwer – and I had to
use it again to reattach the hose
when I was done dumping.
Such a pain.
That needed upgrading as well (though
it didn’t happen till a couple
weeks later).
 I had been searching for more
flexible hose for quite a while, and then
finally, I found my holy grail:
a 10’ roll of flat, blue, 2”
polyethylene
discharge hose (listed on their web site as
“polyethlene pipe”) that HD had
just gotten in stock.
This is
perrrfect!
I even bought a new 5-gallon
pail to get a true fresh start.
I had been searching for more
flexible hose for quite a while, and then
finally, I found my holy grail:
a 10’ roll of flat, blue, 2”
polyethylene
discharge hose (listed on their web site as
“polyethlene pipe”) that HD had
just gotten in stock.
This is
perrrfect!
I even bought a new 5-gallon
pail to get a true fresh start.
 The hole I cut was eye-shaped to fit the hose when it was
unrolled and flexed open.
Then I cut
about 15” of hose, just enough to sink 1/2”
of hose under the lid, and easily
clamped it to the underside of the drain.
This thin material is flexible enough
that I simply lift it out, fold it
up onto itself and clip it.
Then I slide
and lift the bucket straight out.
When I
put it back, I unclip it, unfold it, and
place the end of the hose back in the
eye-shaped hole.
Easy-freaking-peazy.
The hole I cut was eye-shaped to fit the hose when it was
unrolled and flexed open.
Then I cut
about 15” of hose, just enough to sink 1/2”
of hose under the lid, and easily
clamped it to the underside of the drain.
This thin material is flexible enough
that I simply lift it out, fold it
up onto itself and clip it.
Then I slide
and lift the bucket straight out.
When I
put it back, I unclip it, unfold it, and
place the end of the hose back in the
eye-shaped hole.
Easy-freaking-peazy.
The
third
upgrade was the faucet.
The original one
was the cheapest I could find.
It was
only about five inches long and it sat
barely above the countertop.
This thing had been a bad choice.
So,
I
considered all of its bads and went and
bought goods.
The Inchant faucet stands about a
foot tall,
has a flexible gooseneck that will even
allow me to gush water out the open
side door if I want to, and it has a simple
lever that I can move with my thumb
if the rest of my hands are busy holding
water or something.
Huge improvement!
So,
all
of that was the easy part.
NOW for
the pump itself.
First
of
all, the pump casing was about 7” high by
about 4” wide, and would protrude
outward by about 3-4”.
It was too big to
mount to any of the existing wooden studs,
so I went and got that 9” wide plank
of ¾” Sande plywood that I had used in
conceptualizing the Sometimes Shelf, cut
it down from 40” to 24”, and power-screwed
it vertically onto the upper and
lower studs along the rear side of the sink
cabinet.
Now I had a perfect, sturdy,
convenient pump
mount.
Getting
the two, clear, plastic, 1” hoses attached
was quite simple:
a long one (4’ or so) from the
bottom of the freshwater
tank to the pump (through the gap in the
rear cap that was for the spigot, if
the tank were deployed differently), and a
short one (about 15”) from the pump
to the faucet.
Then I slid the “worm
gear” clamps into position and tightened
them.
 That
left the wiring.
Ohhh kayyy.
That
left the wiring.
Ohhh kayyy.
I
had to pat myself on the back here.
Before putting the ceiling up, I ran
a half-dozen ten-foot-long,
white-sheathed, red-and-black wires up
across the rafters, spaced a couple of
feet apart, leaving a few feet on each side
that I could coil up and tuck into
the recesses for future use.
You know,
just so if I ever wanted to add anything
electric – like, I dunno, maybe a
water pump or something – I would already
have the wiring and would not have to
take down the whole damn ceiling.
Mannnn,
was I glad about that!
The one across
the very middle of the van was perfect for
this task.
The pre-stripped ends on the
driver’s side
just needed to be connected to the fuse
panel, but the ones across the van
needed more.
 First
of all, I had to drop this end of the wire
down to pump level without leaving an
ugly white thing dangling out for all to
see.
The ProMaster’s inner frame is sturdy
steel, but the ribs and such are
not solid steel.
They have holes and
gaps and spaces, that, if you’re lucky, will
allow you to run wires or whatever
through them.
The tricky part is that
they have dead-ends here and there too, and
you can’t tell where they are
because, well, you can’t see through the
steel.
First
of all, I had to drop this end of the wire
down to pump level without leaving an
ugly white thing dangling out for all to
see.
The ProMaster’s inner frame is sturdy
steel, but the ribs and such are
not solid steel.
They have holes and
gaps and spaces, that, if you’re lucky, will
allow you to run wires or whatever
through them.
The tricky part is that
they have dead-ends here and there too, and
you can’t tell where they are
because, well, you can’t see through the
steel.
I
did get lucky and was able to drop my wire
straight down the vertical shaft
just behind the slider door.
It
dead-ended, but not till it was below sink
level.
At that point, I was able to snake
the wire
out and make the necessary connections,
which were multiple.
Flow-Max
comes with an on-off control.
It’s a red
plastic rocker switch.
So, the wires
from the power source needed to be connected
to the switch, and then the wires
from the switch needed to be connected to
the motor on the pump.
So,
for that, I had to remove the side panel of
the cabinet.
A small rectangle had to be cut
through the
¼” cedar plywood, but there was yet another
snag; the little plastic frame of
the switch was too small to work with ¼”
plywood.
Grrrr.
 Once again, the laser at work came in
handy.
I was able to cut a small plate out
of 1/16” plastic, and cut the exact shape of
the switch-unit out of the middle
of that.
Then the switch could nestle in
that plate.
Only then could I affix that
combination to the rectangular hole in the
cedar and reattach the panel to the
cabinet.
After all of that, the final
connections could be made and the wires
taped to the wall so as to be out of
the way.
Once again, the laser at work came in
handy.
I was able to cut a small plate out
of 1/16” plastic, and cut the exact shape of
the switch-unit out of the middle
of that.
Then the switch could nestle in
that plate.
Only then could I affix that
combination to the rectangular hole in the
cedar and reattach the panel to the
cabinet.
After all of that, the final
connections could be made and the wires
taped to the wall so as to be out of
the way.
It
was time to test it.
I
flipped the rocker switch on, heard the pump
motor kick in, and saw the water
start to flow through the clear plastic hose
and up into the pump.
I was feeling damn fine about my
bad self….
Until
water started spitting out in sprays from
every connection point.
Switch off!!!
Bahhh,
I said sheepishly.
I guess attaching the
hoses was easy, but attaching them so
they’ll be freaking watertight was
going to be another matter.
The 50 PSI
pressure and 3 gallons-per-minute flow rate
were way too strong for my
preliminary hook-ups.
More work to do,
Lou.
So,
I took the following steps:
I
took out my power drill, put in the flathead
screwdriver bit, and tightened
those clamps about 100% tighter than I had
been able to get them by hand.
I
fetched my tube of Dicor Lap Sealant, which
you will remember was so key in
waterproofing the roof fan way back Step 1.
I slathered that goop so thick all
over each junction, totally
obliterating the clamps from sight.
I
had some Gorilla Waterproof tape left, so
after I let Dicor sit for a while, I
wrapped tight sleeves of tape around each
connection, up onto body of the pump
and tight around a few inches of hose.
Then,
I doused the sleeve ends in Dicor.
It
looks like a wreck, but after letting it set
for a few hours, I came back and
flicked the rocker again.
The hoses
filled up, there were NO SPRAYS AT ALL, and
the pump shut off when the pressure
stabilized.
Yay!!
I
then rotated the lever on my tall, upgraded
faucet and water gushed forth in a
steady, strong, and controlled flow.
I
looked underneath and all was dry.
SUCCESS!! I
have running water!!
(And
half-a-year
later, still no leaks.)

Above (L to R):
hand-held, cordless vacuum; the
orange tank for gray water; the yellow
“jug”; the erstwhile wastebasket that
holds four 1-gallon jugs as my back-up
supply; the translucent freshwater tank
with easy-access lid.
Upper center: the
FlowMax
water pump (before the extra
waterproofing), next to the rigid
drainhose (which
was replaced shortly thereafter).
Upper left: wiring
for
rocker switch.
Far right, for
emergencies:
the still-unused as of this
writing (thankfully) camping toilet.


