|
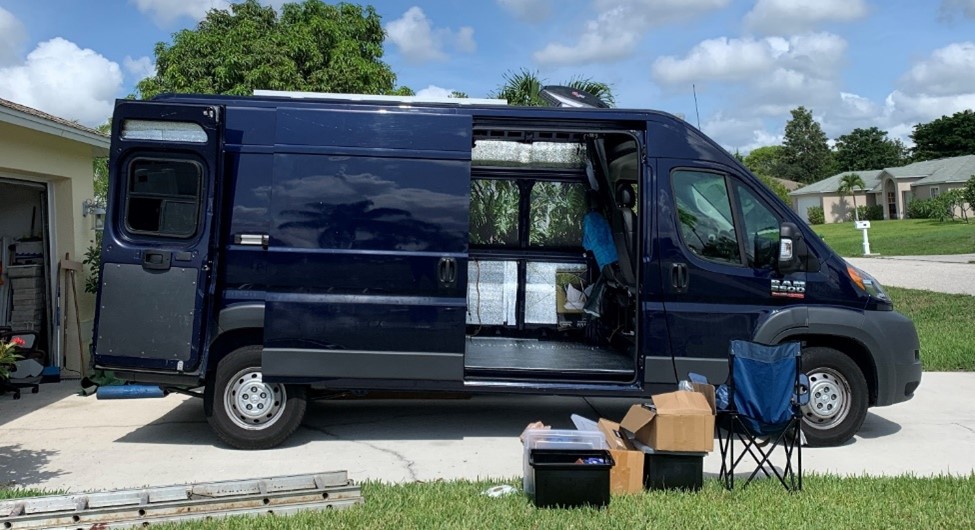
THE D.I.Y. VAN
CONVERSION
SOLAR PANEL Trina 370W Monocrystalline Panel 77.2” x 39.1”
x 1.4” -- $363 including shipping
XOOL Solar Panel Roof Mounting Z-Brackets -– 2 sets of 4 for $22
The next step was to mount the solar panel on Maxx’s roof. I had thought that Brian and I might finish the floor, then chill in the house or lounge in the pool, and – dare I say it – maybe have a libation or two, and then come back out in the very late afternoon, when the sun was not as enthusiastic, and mount the panel then.
Brian was in Work Mode, though, and he had momentum. I kinda got the feeling that it was mount now or mount alone later. Work Mode comes and goes. You just hope it doesn’t go when you’re only halfway through the job.
Inertia is a powerful force, too, and once the object at rest is comfortable in his pool (with beer in hand), said object will have a very strong tendency to remain at rest. Since the objects in question (i.e., Brian and I) were currently in motion, we had to utilize that inertia while we could and keep ourselves in motion.
The selection of the Trina 370W Monocrystalline panel probably involved more research than everything else, except for the “solar generator” itself (see Step 7). I wanted a LOT of power. Many videos depicted vans with a single 100W panel and a happy couple inside gushing about how content they were in their solar-powered van life. But the numbers just didn’t add up.
I spent a good chunk of this research period taking a self-guided course in Electricity 101, wherein I learned the fundamentals of volts (power available), amps (rate of power flow) and watts (total power attained). The basic formula is: Volts x Amps = Watts. Thus, a DC device that runs on 12 volts and requires a 5 amp “pull” uses up 60 watts (12 x 5 = 60). Now, 60 watts is pretty low, especially when you look at a small microwave oven, for example, rated at 900 watts. Or small space heaters that have 1000w and 1500w settings. I just didn’t see a 100W panel as being anywhere close to enough.
Subsequent videos – my favorites were Will Prouse’s YouTube presentations (that dude is a kick) – touted the value of using multiple 100W panels “in series” or “in parallel”. One way keeps the voltage the same, but ups the amps; the other way keeps the amps the same but ups the volts, all depending on how you connected the wires. Something like that, anyway. I’ve forgotten already because I quickly decided that either way involved entirely too much wiring for the likes of me.
So, heeding my lifelong mantra of “It’s better to have and not need than to need and not have,” I decided that getting one big-ass, high-output panel was the way to go. And 370W was about as big as I could get for a van roof.
I shopped for a long time, doing research on each manufacturer, and the quality of the materials they used, and tedious shit like that. Prouse did a comparison video to see if polycrystalline was indeed better than monocrystalline. Much to his unbiased, sincere and entertaining surprise, mono proved to be the more efficient. To further muddle things, I saw two other videos where a high-priced panel and an economy panel were put in direct competition, with the bargain unit prevailing in both cases.
Some brands were better in this way, some were better in that way, yeeesh. Trina Solar seemed to have as good a reputation as many better-known brands – not at the top of any list, but not anywhere near the bottom either -- and they offered the highest wattage, so I locked in on them. But from which supplier?
I gotta say here that I almost went with tape to hold the panel down. Ya, you read that right: tape. Several videos and articles touted the bonding strength of 3M VHB tape, and claimed that it was more than sufficient to hold a solar panel to a van or RV roof. VHB stands for “very high bond”, and it better be if it’s going to keep a 60-pound metal slab from peeling off at 80 MPH on I-75 and careening towards the windshield of the poor jamoke behind me.
The concept of tape as opposed to 16 holes, 16 screws, and 16 potential leaks was very appealing. Even the Hobotech guy on YouTube – another of my trusted mentors – had used it on his own van and gave it a thumbs up. But I just couldn’t shake the image of the panel gone airborne, so I settled on the more mechanical option.
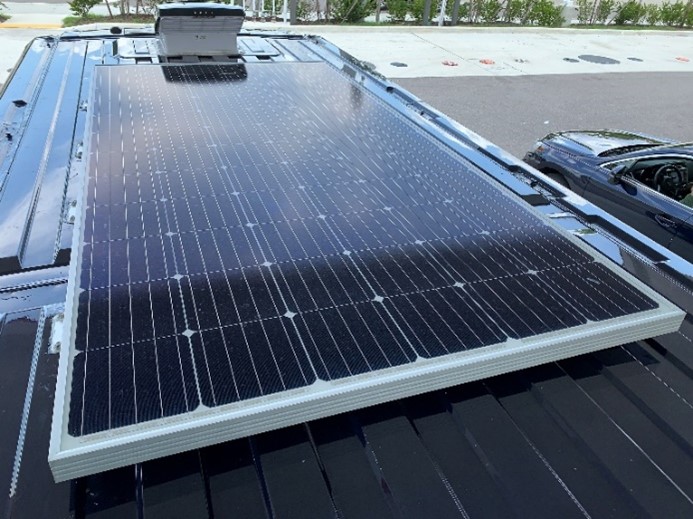
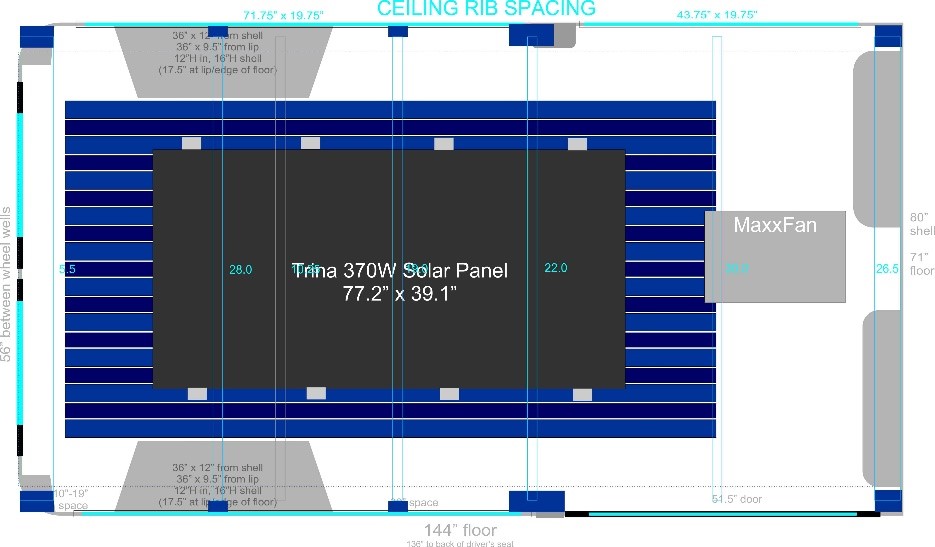
The Z-brackets were easily attached to the panel’s frame and the beast was ready to be put in place. I had measured out a space from the back of the MaxxFan, and I had diagrammed the roof’s ridges on my laptop, so I’d be sure that the brackets would all sit on the plateaus and not in the valleys.
I climbed up the back ladder and onto the roof while Brian steadied the Trina on the 10-foot ladder. We used that ladder as a ramp to slide the panel up to roof height, then I manipulated it into its designated position. (The brackets scratched the side of the roof a bit, but a little touch-up paint cured that later.)
Finally, a hole had to be cut to pass the wires from the panel into Maxx’s interior. Prior to this project, I had never heard of a Hole Saw. These things are the bomb, though. It’s a drill bit with a barrel on the end, and the barrel has saw teeth on the outer rim. They come in many diameters. I had a 1” hole saw that was perfect for this. I put it on the drill, announced to Brian that “I’m going to start drilling the hole now,” and about a second later announced, “OK, that’s done.” It just effortlessly chomped a perfect 1” round hole in that sheet metal. Part of me wanted to keep cutting more holes, just for the thrill. Brian was wise to keep me out of his garage.
The wires already had MP4 connectors on them, and they fit just right through that hole. I butyl-taped and lap-sealed the hell out of that little orifice. We went inside and attached some locking nuts to the end of the screws that protruded through the ceiling. We put the big items back in the van – Brian’s neighbors were probably wondering about that bed in the front yard – and pushed the rest into the garage “for now”. We decreed Job Well Done and escaped from the hot midday sun into the cool of the abode.
We had started working on the floor at about 9 AM, and finished the solar panel task at just about noon. Three hours for two significant steps. Not bad at all.
But, as a wise man once said, “The job isn’t finished till the clean-up is done.” So true. But that part would wait until later. Cold beers and a cool pool were the rewards for our labor, and we pursued them forthwith.
Five hours later, I returned to the work area to tidy it up. The huge, clear plastic “body bag” that the Trina 370 had been packed in would prove to be just about the perfect size to stuff all the trash and junk into. Work Mode came back and, rather than do a half-assed job of it, I dove into the task of reorganization. As The Project began, things were acquired a few at a time, and I tended to just jam or squeeze them anywhere they would fit. Hence, there was no logic to any of it.
I took all the brown plastic storage bins, which had been lurking under the bed for a few years, and emptied them on the garage floor. Then I started sorting everything into an organized system: saws, blades and other cutting devices in one; drills, bits and screws in another; adhesives, bungees, tape and such in yet another; hand tools; auto-related things; lights and batteries; yada yada. It took a couple of hours and a couple of beers, but when all was done, everything was packed sensibly in the van, and I knew exactly where everything was.
NOW, the job was done. Back the pool!
HUGE thanks to Brian, of course, for all his efforts, know-how, and eagerness to work. These two steps might have been possible solo, but they would have been a bloated bitch to do, and significant injury may well have occurred.
Some people I know would have been, like,
“Here’s your ladder.
I’ll be inside.
Let me know if I can help you by
bringing you another beer or something…”
What would I have done differently?
So far,
nothing. This Trina Monocrystalline
panel chugs sunshine. Freaking chugs
it. It's going to take a week or more
of rain for me to run out of power.
ADDENDUM
More Solar! Newpowa 100w monocrystalline 12V solar panel - $106.96 Renogy 20’ 10AWG Solar Panel Extension Cable with M&F Connectors - $34.99
The Trina 370-watt monocrystalline panel that I adorned my roof with has worked great since Day 1.
But, pretty much on a whim, I climbed by backdoor ladder, took a look, and decided the vacant space near the rear of the roof could be out to better use. It was not large enough to put any kind of worthwhile platform up there, though I did toy with that idea.
There was this vision of a small but sturdy wooden platform that I could (a) plunk a chair onto and veg out cliffside somewhere, or (b) set up my camera tripod for long time-lapse videos or even astrophotography, like star trails and Milky Way stuff.
Tempting ideas to be sure, eh? You bet.
But I did not feel like building a platform. Or carry a chair up that ladder. And I can set up my tripod up there anytime anyway, platform or no.
I settled on the Newpowa 100W mono, mainly because it was cheap, and my “budget” for this project had pretty much topped out. I couldn’t be sure, because I had cleverly stopped updating the Excel spreadsheet that I had been keeping when it looked like I might pop through the ceiling sometime. It was never a very strict budget anyway. 😉
Size-wise, it was great fit. I orientated width-wise, perpendicular to the big Trina, and right up close to it. This was key because of the holes I had to drill to secure it with the Z-brackets. Everything topside was fine, but I wanted to secure them from the inside too, as Brian and I had done when we mounted the 370.
The brackets along the very back were cake; the screws popped through behind my RAMACK logo panel where I did not put any ceiling.
The hole saw was brought out of semi-retirement and whirred a quick and tidy 1” hole near the very back, through which I ran the panel’s cables. They are short, so I purchased a 20’ extension cable set, which I ran under the bed, through the wheel well frame, and forward through the dark recesses behind the dresser, where it emerges, as luck would have it, right next to the Maxoak Bluetti EB240 solar generator. Well, who woulda thought? How handy is that?
MaxBlue was the impetus behind the whole concept, to be honest. Sharing with Delta was getting challenging; MaxBlue’s recharge rate was just too slow, and Delta had chilling duties that could not be set aside for anything but very short periods. So, this 100W panel was all MaxBlue’s. Those two are connected all the time – unless shore power is there for the taking.
The Newpowa pulls in pretty good sun, I have to say. I’m still trying to figure out how the hell the solar industry comes up with their numbers. This 100W panel shows an average of about 55-60 on MaxBlue’s input display. From my experience, this is pretty good! Delta registers 220W or so from the Trina 37, which is pretty close to 60%, so that’s about the same.
If 60% is the reasonable expectation across the board, why not just rate the panels for what they actually provide, not something 67% higher?
And, yes, that math is correct, you can put your hand down. If A is 60% of B, then B is 167% of A. Go ahead, get out the calculator and prove me right. A = 60 B = 100 A/B = 60/100 = 0.6 = 60% B/A = 100/60 = 1.67 = 167% (60 + 40 = 100)(40 = 67% of 60)
This is the same math that merchants dazzle consumers with every damn day. Getting 4 instead of 3 is a good example. You get 4, and 1 was the bonus, which is 25% of your total, right (1 out of 4)? But they advertise 33% more, because you got 3 plus 1 and 1 is 33% of 3. Same quantities, just a different perspective.
Yeah, so, right, whatever, yes? (Enough commas, for ya?)
Back to solar. When you shop for panels, you are likely to see companies boast about “22.5% efficiency!” like that is something to marvel at.
First of all, I have no idea what it really means. It only has value compared to panels with less that that number, I reckon.
Secondly, 22.5%??? That SUCKS! Can you imagine if everything in your life had a success rate of 22.5% or less? Ya, good luck driving home tonight. Car might start, traffic lights might work. And, yeah, brakes might too. Are you feeling lucky? Well, are ya? Things will FAIL almost 4 out of every 5 tries!
And enjoy that airplane ride. And hold your breath as you flush that toilet, too; it worked the last two times. Ewwww.
22.5% indeed. And 22.5% of what??? Does that mean I should expect only 22.5 watts out of my 100W panel?? I HOPE NOT!
So, I admit that much of solar mystifies me, and I do think that is on purpose. If the purchasing public is too knowledgeable, it is too hard to fool them.
But, bottom line is that the Newpowa was a good addition. So there.
And, if I do want to set up my camera up on the roof now, the flat panel will serve as a nice platform, especially at night.
ADDENDUM November 2022 SOLAR EXPANSION, PLAN A Solar Panel 800W 4X 200W Ip67 -- $406.34 (x2) Everbilt 1 in. x 96 in. Aluminum Square Tube, 1/20 in. Thick -- $41 (x5)
Flexible solar panels intrigued me. The ones being sold on Amazon were so cheap – and so readily returnable – that I could not resist trying out a set.
Think about that. 400W per pair, four pairs. Eight panels taking up an 88” x 42" area. 1600 WATTS OF SOLAR in the same amount of space that is currently giving me a very capable 470W. 1600!!!!!
Wire them in series, run 2 pair into D-Max (which can handle 800W input) and 400W each into Bluetti and Delta (their max inputs). Perrrffect! I will be king of the Solar World. They will laud me as the Sun King and build me a palace. I shall name it Versailles and make it the gaudiest shitshow of a palace ever …
And then never live there. Because I am a Van Man, Stan. And a van man with 1600W of solar on his roof. I will NEVER run out. My SGs will be full all the freaking time! This is too good to be true, right? (Spoiler alert: it was.)
Now, I know that I’m not expecting the full 1600. From my 470, I’m having a good day if I’m reaping 280, and a HUGE day if I’m up around 320. So, by that logic, I’ll be happy with 800-1000 and ecstatic with 1200. But even if I only pull a measly 600W out of those eight 200W panels – a paltry 75W each! – I’ll still be more than doubling the feed I get now.
Gotta give it a try. I ordered my four sets and waited my 2-3 weeks for them to get here (from China, apparently).
Meantime, more than a little bit skeptical, but rolling with the “what if’s” of it all, I set to work on my roof rack. The flexies would be attached to aluminum 1” square tubing, cut and fastened together in a grid. Attaching flexies directly to a flat surface causes them to overheat and have a dramatic drop in performance. Having that 1” air gap under them would cool them – especially while driving – and eliminate that issue.
It would be easy to make, too. ZMax brackets and screws, zoom zoom. Two almost full-length tubes (they come 96” long, I cut off the last 8”), and nine 40” crossbeams spaced 11” apart. I cut and assembled the whole rack in one evening.
Then I’d fasten the panels to the grid tubes with washers and screws at the grommeted locations, overlapping the panels back-edge-over-front-edge for maximum wind flow, and hoist the whole light-weight contraption up onto the roof.
But, before I went toooooo far, I waited for the flexible panels to get here. I was eager, for sure, but not quite to the point of idiocy. I had never dealt with flexible panels before. If they were so damn good, why were they so damn cheap? Before I totally committed, I had to test one under the Florida sun.
When they finally arrived, the temptation to secure those flexies to the Rack and just go ahead with the install was strong indeed. I mean, how bad could it be, right? Even if I only got a quarter of the total wattage – a mere 400 out of 1600! Just 50W per panel! – that would still be a 25% improvement over the status quo of ~300. How can I go wrong here??
But I waited.
Finally, a blazing sunny day dawned. I checked the input gauge on Bluetti. From the Newpowa 100-watter, it was taking in a steady 59, so almost 60%. That’s a good day, though there are sometimes better.
I unpacked one of the new 200W panels and peeled off the cellophane mask. Then I carried it out to BM, opened his rear doors, and unplugged the Newpowa from its extension cord. I plugged the 200W in and lifted it up and laid it on the roof, on top of the 100, so I knew that the sun angle et cetera et cetera would be identical to what had just been sucking in 59 watts.
Eager as all get-out, I scampered around to the side door, climbed in and peered at the input gauge. Would it be 118, the same % but double the watts? More? Or maybe a respectable 90?
I stared in disbelief. 20. Twenty fucking watts. Are you shitting me?? 20?? Nope, then it moved. 21. 22. 19. 18. 19. Back to 20, and stayed there.
Stupidly rationalizing that maybe it needed to “warm-up”, I busied myself with a couple of other tasks. When I came back … 20. It might as well have had a raised middle finger on the display beside the number.
So, I get 60 watts out of a 100W panel and 20 – TWENTY??? – out of panel that should be TWICE as powerful????????
I was unhappy. If you know me, you know how unpleasant I can be to be around when I am unhappy. Ever see The Hulk? But without the bigness and greenness.
Once the earth stopped shaking and traffic returned to normal, I unplugged the useless piece-of-shit 20W panel and put it back in its box. Then I went to Amazon and launched the RETURN process. Give me my $812 back, ya rat bastids, your panels are c-r-a-p CRAP.
Which I should have known. Right?
So, I DEFINITELY should have known six weeks later when pairs of 400W panels were on sale for almost the same price. I laughed and said “WTF? I got this dumb Rack sitting here, maybe these panels are better??”
Long story very short, they were not. Exactly the same, pulling 10% of their advertised wattage. So, they went right back as well.
Worth a try, I guess. Sure would be a lot easier if there was a place I could go, pull a panel off the rack, plug it in and see what I’m getting. Shit, I would have paid $2000 to get a legit 800W of solar up on that roof. With conventional rigid panels, though, there just isn’t room. They are too long to have more than one 400W up there length-wise, and wide enough that they would overhang the sides of Blue Maxx by a good bit if I turned them that way.
Sigh.
ADDENDUM March 2023 SOLAR EXPANSION, PLAN B Newpowa 9BB Cell 200W Monocrystalline 12V Solar Panel -- $214.95
But hold the phone, Joan. The Delta Boys, with the fast recharge, seem to do OK. It’s Maxoak Bluetti – henceforth referred to as MaxBlue, a clever twistaround of Blue Maxx (don’t you agree?) that I can’t believe I did not think of sooner -- that needs help the most. Poor guy only gets to suck on a 100W teat while the Deltas get to take turns on the big juicy 370 boob.
Maybe I just have to boost MaxBlue’s binky a bit.
Hmmmm. What’s thisssss? Newpowa now has a 200W panel, with all the same specs as the 100W that I’m currently feeding to Blue. Interesssting.
It’s about $200, and it definitely should double the input, and hence cut the recharge time in half. The panel (a rigid one) is BIGGER, like a lot bigger, like as-long-as-the-van-is-wide bigger, but, if I reconfigure the Rack, I could attach Newpowa 200 right on top of Newpowa 100 and it would fit.
It would be a modest upgrade, but with a modest price tag as well. And I spent a couple hundred bucks on all that aluminum tubing, so I gotta use it.
April 2023
So, I pulled the trigger on the purchase. The day after that 200W panel arrived, I unpacked it, hoisted it up onto the roof – a neat trick in itself with one hand holding me onto the backdoor ladder and then one-arm-lifting it up, past, and above me into position – connected the extension cords and rushed inside to check the meter on MaxBlue.
The display had been showing a steady 55, so I was delighted when I saw “110” on it! Exactly double, as it should be! We had ourselves a winner, baybee.
Within the next week, I disassembled the ill-fated 8-panel aluminum grid, and reconfigured it for the 200-watter.
So, OK, here was the plan. The new Newpowa 200 is 55.5” x 27.5”. The old Newpowa 100 was 44.5” x 20”. I had no intention of removing the 100. From the get-go, the 200 was planned to sit on top of the 100. But how to make that work?
I did not want to permanently disable the 100, just in case. Solar panels are pretty simple constructions, though. The layer of cells is quite thin, and the aluminum frame is about 1.5” tall. This leaves an inch-plus of unbacked metal to drive screws through.
It occurred to me that, if I could get the measurements right, I could cut a couple of 1” aluminum tubes to 27.5” lengths, and drive a half-dozen or so self-tapping 2” screws through each and into the portside and starboardside of the 100. If I then drove a couple more upwards through those same tubes and into the underside lip of the 200, that would create a pretty damn stable brace.
But it would have to be done in the right order. I did not want to get to any point and find myself saying, “ohhh, crudface, I didn’t think of that!” (I hate saying “crudface” for any reason; it’s such a wussy word.)
I laid it all out in CorelDRAW and studied it over and over. Completing the three-sided bracket first made the most sense, then attaching it to the underside of the 200. From there, I’d heft it up onto the roof, position it properly and drive the tappers into the sides of the 100.
The problem, though, was that the 200 overhangs the 100 by a good bit. On the passenger side, it was only 3-4”, but on the driver’s side (due to the uneven positioning of the 100 during its installation), the overhang was 6-7, and the body of the power drill was too wide to fit between the van’s roof and the underside of the 200.
Not a problem, though. I procured a 6”-long Phillips head bit from the local hardware store, and, just in case, I grabbed a 12” bit holder as well. (As it turned out, the 6” bit was just long enough.)
I had taken the 27.5” side braces up to the roof beforehand and had driven the tappers through them and into the sides of the 100, just to create alignment holes and make the final installation (hopefully) simpler. Then I unscrewed them and brought them back into the workshop to affix them to the 200’s underside.
(As it turned out, that step was unnecessary. The screw-through would have been every bit as easy without those holes there. I can’t even say for sure that the screws actually went through those pre-drilled holes.)
So, everything was looking great. The frame was tightly attached to the 200, and it was ready for the roof. Almost.
Stealth is important to any boondocking VanLifer. The midnight metallic blue paint job (which RAM has renamed “True Blue Pearl”) makes BM essentially invisible in a hotel parking lot at night. But silver aluminum is very easy to see.
I had long ago applied dark blue spray paint to the sides of the 100 and the original 370 (as well as the white plastic areas of the rooftop MaxxFan), so I knew my new solar layer needed similar camouflage.
Deeming it easier to paint it on a workshop table than up on a 9’6” high roof, I took the time to hand-paint all four sides, two coats, with navy blue latex paint.
OK, now to get it onto the van.
I had my collapsible 16’ Yvan ladder out and available, but the only truly practical angle of attack was from the rear. Once again, I clung to the top of the Prime Design backdoor ladder with my left hand and used my right to hoist the now-framed panel up and past me onto the roof.
Once the 200 was in approximate position, I climbed down and ascended the Yvan to move the large panel into its permanent location.
It didn’t fit.
What??? I had cut everything too snugly?? Nooooooo!
The self-tapper screws were already nestled in their spots on the side braces, so I thought that maybe, just maybe, if I backed them all back about a millimeter or two, then that might be enough to make the difference. I moved the ladder to the sidewalk and climbed to do that little bit of unscrewing. No change. It still would not slide down into place.
Same thing: the contraption would not settle down into place. Fucccck.
The prospect of bringing this beast back down and unscrewing all those screws just to move one side brace ¼” outward was not appealing. Ugh.
So, I moved the ladder back and climbed back up the passenger side, trying in vain to nudge the 40-pound panel forward about an inch, in the hopes that it might drop in. Then I tried the same back on the street side. I got it repositioned, but, to my chagrin, it would not drop. Arrrrgh.
Running short on optimism, I climbed the sidewalk side once again. This time, I got the frame to shift forward and – lo and behold – it plunked down perfectly in place! Yee-freaking-har, Lamar!
I clambered down, grabbed the power tool and got those tappers screwed in as fast as I could before the panel changed whatever mind it might have had.
YAYY!
But, now, it occurred to me: what if the wiring doesn’t work? It was a typical look-on-the-dark-side thought, born of a lifetime of not-quite-thought-out plans. It had worked just fine when I tested it a week before, so it was borderline irrational to think that way now, but I did not want to celebrate until this thing was actually sucking sun into MaxBlue at an acceptable rate. (So, take back that YAYY! of the previous paragraph.)
What could go wrong, you ask? Well, I had never actually checked the length of the 200’s cables. The manufacturer does not give you much to work with, about 3-4 feet. I did not know if this would be long enough to reach the already-maxed-out extensions that the 100 had been connected to.
Then there was a delay.
For much of this unretired winter, having returned to my former job to help out my former boss in his time of need, I’ve been able to boondock in a legal parking spot right outside the front door of work. From here, I have run a 50-foot, 1875W-rated power cord to keep my SG’s attached to shore power, as well as tap into the work wi-fi so I can watch YouTubeTV on my iPad without burning through all my data. (Having a bathroom just 100 feet away from my bed has been a boon occasionally too.)
Well, I bring this up because MaxBlue had been shore-charged all night and all day and was all topped off when I connected the 200. Hence, MaxBlue was contented and full to the belching point and accepting no further watts for the time being. Bah.
I had to drain off some of that power before I could even know for sure if the 200 would feed MaxBlue properly. I plugged in and turned on some stuff -- my AC fan, my AC desk lamp, all my interior DC lights, both laptops (AC), my DC signal booster, my DC fans – creating a collective draw of 200+ watts and waited a while.
After about a half-hour, I came back and saw that the five-bar power level meter was down to four bars. I plugged in the solar extension cable. The numeric meter off to the right showed “0000” for several seconds. It always shows that at first, but this was starting to seem a tad long.
Then the display stirred. The 100 had been pulling 45 under the partly cloudy sky, and I watched as the numbers climbed and leveled off at 90. It was not quite the 120 that I was hoping for, but it was exactly double what I had seen before. All was well!
(A couple hours later, under blazing sunny skies, that meter read “0145” – 145 watts! 145!! Dayummm, that exceeds all hopes!)
But, in getting the 200 onto the roof and into position, I had scratched off some of the fresh latex paint. I had a spray can of Rustoleum Dark Navy handy, so I went to town on just about everything I could reach.
Then I got really carried away and did what I’ve been saying for three years that I would do: paint the backdoor ladder! If an aluminum solar panel on the roof compromises your invisibility, then you know a silver ladder is going to stand out even more.
I gave that thing generous sprays from all angles and it looks amazingly good. Climbing up it will probably scrape some of the paint off the tops of the rungs, but, really, why would I climb up it now? The 200 blocks access to anything I might have been able to reach up there. In fact, the 200 even overhangs the back edge of the van.
Maybe it might be necessary to climb up there to squeegee the 200 itself, but if I’m doing the 200, I will probably need to do the 370 as well, so I’ll need to get out the Yvan ladder anyway.
So, I suspect that will be the end of my solar expansion. 570 watts is a pretty good amount to have on the roof of a van. MaxBlue is loving it!
|