|
THE D.I.Y. VAN
CONVERSION
THE
UPPER DECK
This would be the most complicated, convoluted, and confounding Step yet. It would involve carpentry and electrics, a whole lot of planning and revision (and re-revision), and, to my surprise, a good bit of improv on the fly.
But they would also be the first “completed” step towards the RV interior. No ordinary boxes, these. Nay, nein, nyet, Chet. Aromatic cedar, ahhh, mmmm. Stylish fabric bins to keep the contents contained and quiet. Sliding cedar doors. An array of recessed silver puck lights on dual dimmer switches. Niiiice.
But… how the hell am I gonna do all that?
Well, for a change YouTube wasn’t all that helpful. There were plenty of videos, but nobody seemed to want to do it the way I wanted to. Maybe that means that my way was a really stupid way, but, well, one way to find out.
Some people in those vids seemed to be adding cabinets to otherwise completed walls and ceilings, as if the compartments were an afterthought. Nah. Walls and ceiling would get finished later, after all the wiring and such would be in place. No sense wasting good paneling by having it hidden behind cabinets.
But I knew what I wanted to do. The Floor Plan was still up in the air, but the Ceiling Plan was on firm footing. Ironic, yes? No matter how the bed, desk, sink, or counter would be configured, this upper deck arrangement was gonna be the same.
THE UPPER DECK Part 1: The Frame Unbranded 2” x 2” x 96” furring strips – 6 @ $2 = $12 Unbranded 1” x 3” x 96” furring strips – 4 @ $2 = $8 Simpson Strong Tie galvanized steel ZMAX brackets, various -- $60 Zinc Wood Screws, 2.5”, 2”, 1.5”, 1” = $20 Douglas Fir SRS Mixed Grain Board, 2” x 2” x 96” -- 9 @ $11 = $99 Tempered hardboard, 48” x 96” –- $9 StorageWorks fabric storage bins, beige – 6 for $72
So, to get started, I thought some, uh, “practice” would be a good idea. I mean, Michelangelo painted a bathroom ceiling or two before he tackled the Sistine Chapel, right?
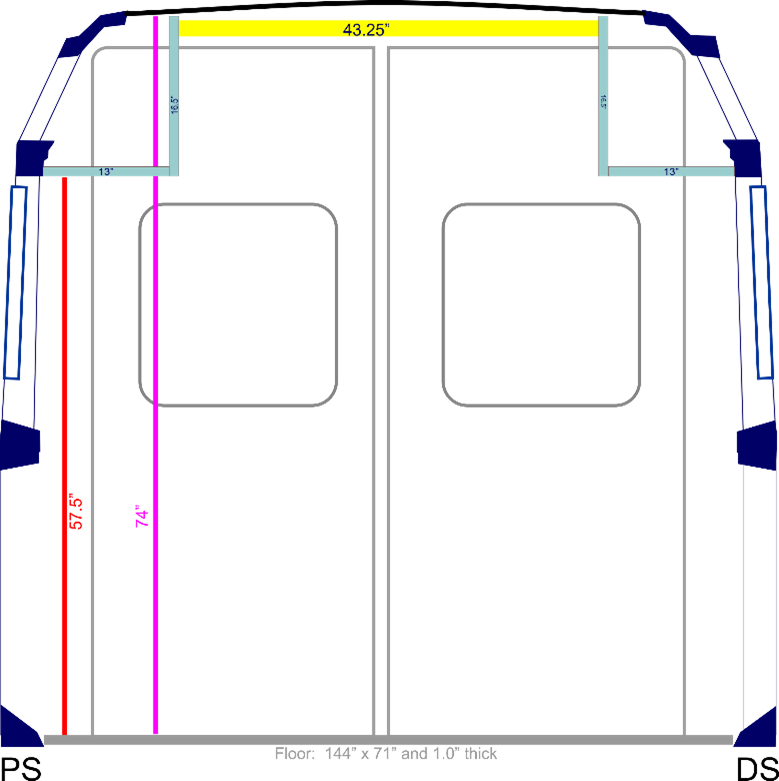
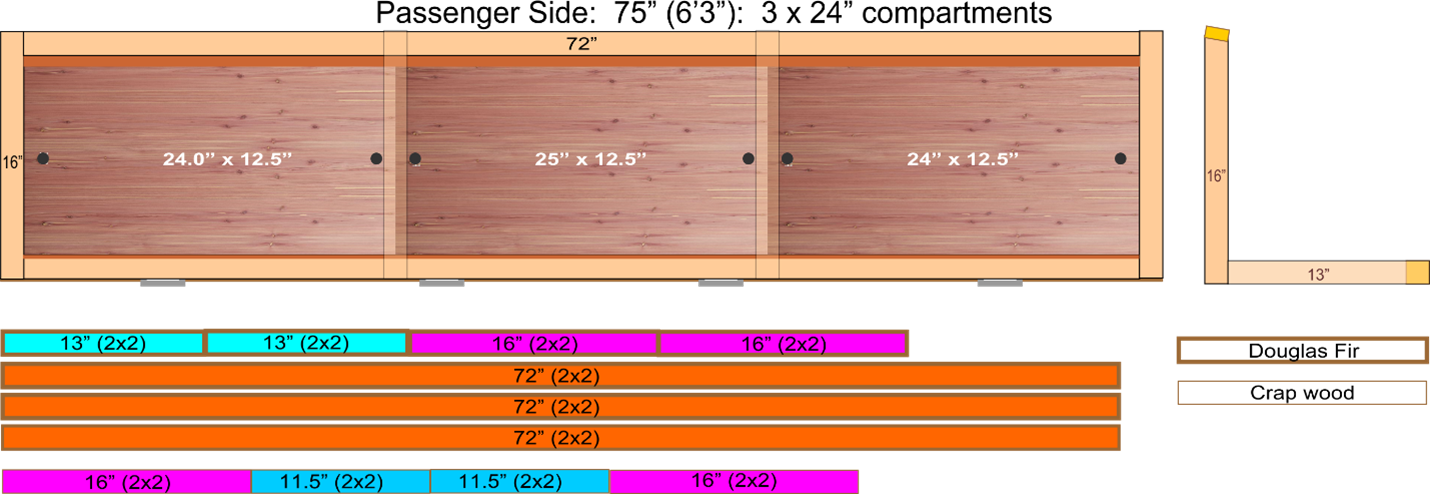
So, I bought some cheap, crappy 2x2’s, 1x3’s – all too easy to come by at Home Depot (HD) -- and some low-cost tempered hardboard panels. I got some paper and sketched out some angles and lines. But I quickly decided that I totally suck at drawing 3D objects, so I dove into CorelDRAW to see if I could do better. I came up with this:
So, that could work, right?
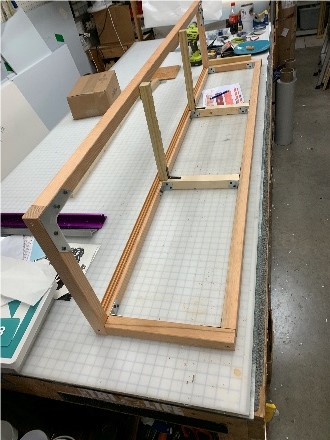
So, I cut up some of the 2x2’s and got to
work on my “rough draft.”
Man, how the hell do carpenters and
their ilk ever get anything done with all
this warped and twisted wood??
I guess I just assumed that it
would be, you know, straight?
Well, a lot of these 8-foot pieces
had about 2-foot worth of straight in them. WTF? I
sawed them up into smaller pieces and
managed to get just enough pretty-straight
ones to put together a simple frame.
So, have I started enough paragraphs with
"so" yet? Thought so.
Ha.
I carried it out to Blue Maxx to see how it would fit. It wasn’t bad, but the uprights needed to be taller, and I discovered a few, um, flaws in my construction. My final draft was going to need more screws, or something. Cross that bridge later…
The good wood that I ordered from HD was going to take a couple of weeks to get here. I hoped the wait would be worth it. The cost too. The practice lumber was about $2 each, but these sweet-looking Douglas Fir sticks were more than a sawbuck apiece. The cedar panels were almost double what I thought I was going to be spending on paneling, but ahhhhh, the aroma of cedar is niiiice.
My original plans called for these good-looking, finished birch library panels that I saw on the Menard’s web site. HD and Lowe’s offer nothing close. But the nearest Menard’s is in Kentucky, so, well, never mind, I guess.
Most plywoods that I looked at were going to want to be finished or stained or painted. Ugh. According to a few articles I read online, though, you not only do not have to do that stuff with aromatic cedar, but actually you shouldn’t do that stuff with aromatic cedar; it would no longer be aromatic. Plus, a little water doesn’t bother cedar a whole lot, and bugs want nothing to do with it. So, a few bucks more for a whole lot less work, with a nice smell to boot? Ring it up!
As it turns out, the Douglas Fir sticks are awesome: straight as you please, with great coloring. The cedar smells terrific and – thanks to a new, 60-tooth saw blade ($20) – it cuts like butter. (Does butter cut well??)
I decided to do the passenger side first. I think I had a reason for that, but I don’t recall what it was. Maybe because it was all just one cabinet over there (the driver side would be three).
I have to backtrack for a second. Another thing I learned from my practice build was that these things were going to be damn awkward to try to put up without a helper.
I checked a YouTube video that had “installing van cabinets” (or something like that) in the title. I watched the guy build this little two-shelf box, and I’m thinking “how the heck is that gonna do any good?” Then he took it to his van, which, it turns out, was pretty much finished already. He set the little two-shelf box on top of this existing closet-like structure and began to screw it into the plywood wall.
I felt so cheated! I blurted out, “Well, of course it’s easy when you’re putting it on top of somethi…n…….g……..” Eureka!
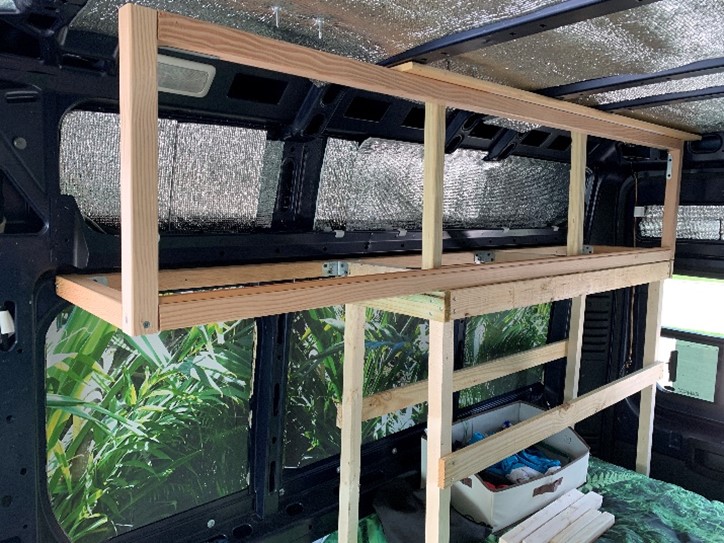
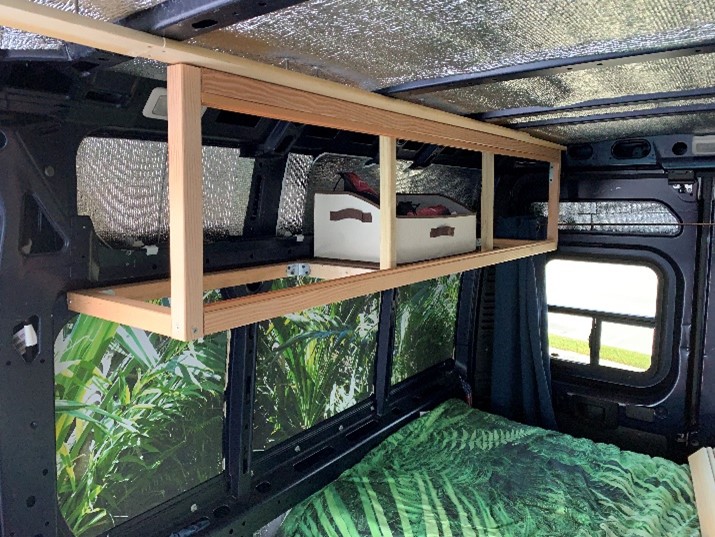
Now (backtrack done), with my fir frame assembled, I put the scaffold in place (straddling the bed) and rested the frame on it. I had chosen the lowest flat surface on the PM’s oddly-shaped upper level. The plan was to drill through the back fir crosspiece and into the metal, and use 2.5” screws to secure it, but, on closer examination, I realized I could bolt it on. There were five spaces that were jussst big enough to squeeze two fingers into that hollow space and get a lock washer and a hex nut on each bolt. I tightened them snug with a nut driver. Then, just for the sheer joy of it, I added a few screws anyway. I was on a roll.
The top had an extra aspect to it, though. There are three ribs across the PM’s ceiling that I could screw into, but I also wanted to plan ahead for my cedar ceiling install. The 16.5” uprights were just about ¾” too short to reach those ribs. That was by design, however.
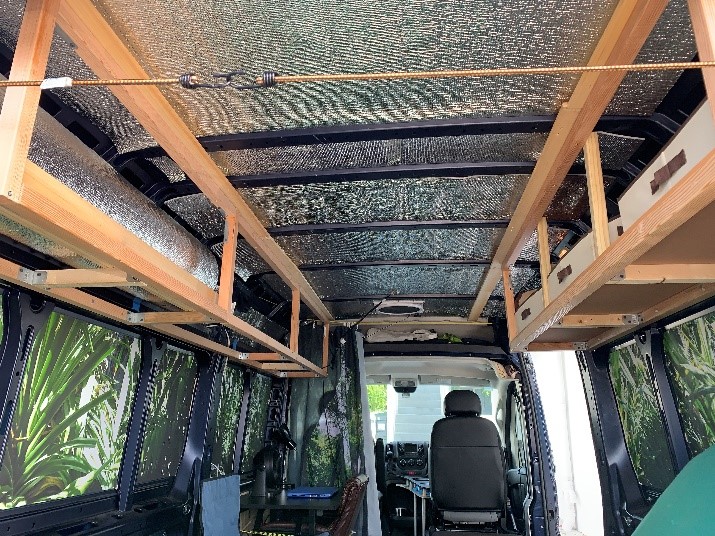
I had this pile of 64” long 1x3’s that I had found near the dumpster at work back in February. They were attached at both ends by straps of fabric stapled into them, which gave the whole kaboodle the appearance of some odd, wide, roll-up ladder. I have no idea what it was for, or where it came from, but I recognized right away that those 12 slats would have some key use in The Project. It was good wood, too: perfectly flat and straight, clean, and brand new. What a find! I attached two-and-a-half (or so) of them along each side of Blue Maxx’s ceiling, about 18” each side of center, from the back door to the front overhead compartment, screwing them tightly into the overhead ribs, and positioning them so the outer half was aligned with the top rung of the cabinet frame, and the inner half was left free and open, perfect mounts for the future cedar panels.
Several screws later, Starboard Side Upper was secure and tight against the ceiling, and I was feeling kinda proud of my humble self.
The driver side was more complicated. First off, it’s more than 10’ long (129”, to be exact), so it was not going to be one piece. Secondly, this side has a big mongo bulge at the primary rib. The p-side cabs did not have to deal with the corresponding bulge, mostly because it was at the doorway, and the cabs were not going that far up anyway.
So, I made two identical frames, same as before but with 40” crosspieces. With the width of the upright sticks, the frames were 43” wide each. Using the same approach as the p-side, I mounted one of them starting as far back as I could, and the other starting as far front as I could. The latter was just barely shy of the driver seat. I got in my cockpit and swung my head around like a village idiot to make sure I wouldn’t be conkin’ my noggin on Douglas Fir. All clear.
The front-lower crosspiece would be dang solid with a couple of ZMAX corner braces screwed into its backside and into its neighbors’ flanks. Cool.
The front-upper had no such option because steel ZMAXes already adorned the neighbors’ upper reaches and were in the way. Hm. But – what, ho! -- two of the ceiling ribs crossed above this 42”-wide section, so I screwed it into those, with a couple more into the slats for good measure. That crosspiece is not going anywhere.
That left the very uneven back. That bulge protruded more than an inch outward. Strange combinations jogged through my mind. But, wait a tick, I’d use the bulge itself as my anchor. I positioned the back crosspiece about 1.25” in from the wall, perpendicular to the existing frames, and double-ZMAXed the ends tight into their flanks. Then I drilled a ¼” bolt right into that obstrusive bulge and locked it in place. Perfect.
So, OK, frames done.
THE UPPER DECK Part
2: The Cabinet Doors Knape & Vogt 72” Sliding Door Track –- 4 @ $25 = $100 Pure Bond Aromatic Cedar Plywood Panels 48” x 48” –- 3 @ $47 = $141
So
Two-sided tape secured the lower half of the 72-inch-long sliding door track. The upper half required small screws placed deep through the tracks. The doors would not be quite tall enough to reach that surface, so there was no worry about the screws compromising the slide. If the bottom starts to come loose, I’ll screw that sucker down too. For now, though, tape is easier and just as effective.
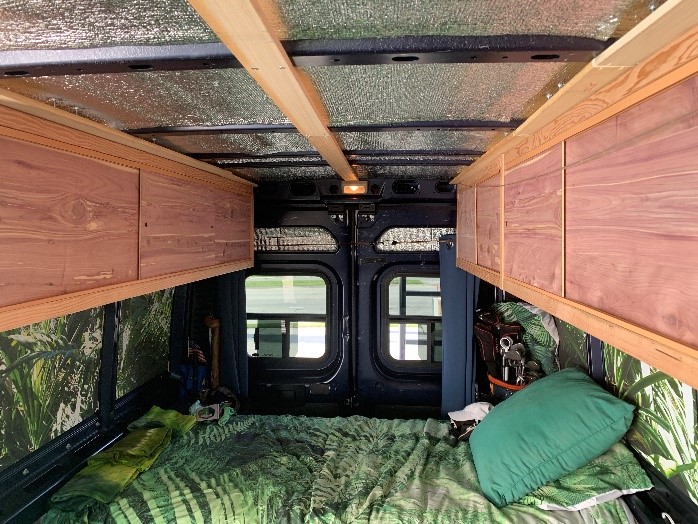
The portside 72-inch-long cabinet would be playing host to three of the beige fabric storage drawers. Those are just shy of 20” wide, so there is room to spare. That did create a mismatch with the doors, though. Four 18” doors would make accessing the drawers awkward. So, I went with two 24” doors on the back track -- one left, one right -- and one 25” door in the middle on the front track.
The doors themselves are ¼” cedar plywood, 12.875” tall. The port side’s three compartments’ doors are in pairs, with each door being 20.25” wide, so that they barely overlap in the three separate sections of 40” track.
But, of course, it wasn’t as easy as all that. Those tracks leave very little room for error. I cut my practice hardboard doors at 13” high. Too tall, except for the front compartment on the DS. No worries. 12.5” looked about right for the others, but, no, too short all around. Fine: 12.75” then. Well, that fit in two of them, but was too short for the remaining two. WTF. Cutting accurate 12.875” would have been tough with my saw, but the laser came in handy once again. That height was barely high enough for one space and barely short enough for the other. Jayzuz. I lasered ½” circle holes – pinky size -- rather than do knobs or handles.
The tracks’ puzzling irregularities were annoying, but, man, those ¼” panels fit nice and snug, and they slide silently. There won’t be any rattling from these doors.
THE UPPER DECK Part
3: The Floor and the Lights Pure Bond Aromatic Cedar Plywood Panel 24” x 96” -– $42 Anypowk 12V LED Puck Lights – 2 sets of 6 @ $27 = $54
The floor of the cabinets is tempered hardboard, notched at the corners for a good fit around the upright posts. The surface is smooth so it won’t wear on the fabric bins. It’s thin, light, and strong enough to support a decent amount of weight; and it’s cheap. Three 24” x 48” panels cost me less than $15 total.
Those panels are not attached; they just rest on the fir sticks. The weight of the loaded drawers will keep them from rattling. If they do start to get noisy, I’ll stick them down with adhesive foam squares. I want them easily removable, though, in case I ever have to get at the lights.
Ah, yes, the lights.
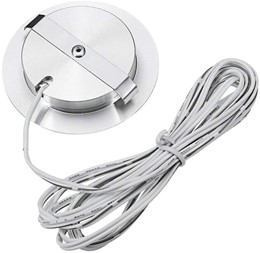
The ten silver, aluminum, recessed,
LED, dimmable, puck lights.
My little touch-of-luxury
accessories.
They would be mounted in the
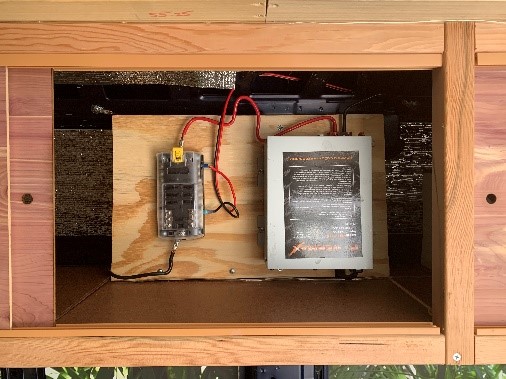
Before I got to the meat of this Sub-Step, a move was in order. The PowerMax DC Converter and the fuse box still lurked furtively under the table, where I had attached them for convenience to the Maxoak Bluetti EB240 power source back in Step 10.
This would not do. I knew when I did it that it would not do. But, like some other things, it was practice. Now that I was going to start actually running wires to them, it made a lot more sense to have them in one of the upper cabinets, at eye level.
And, yeah, I’m going to label them too, unlike every place I’ve ever lived or worked, where you’re guessing blind as to what fuse is for what. Maybe the major one – like “stove” or “fridge” or “heater” -- is scrawled in blurred and faded pencil, but the rest are just blanks smirking at you.
I find myself really taking my damn sweet time in these recent steps. This totally defies my runner’s instinct to do them as fast as I can, constantly checking my wristwatch to see how long it’s taking, and rushing more if it’s later than I thought. I do everything this way. If I have 50 things to assemble at work, I time myself and try to get progressively faster, silently celebrating every new record. The game mitigates the tedium, and I get my work done much faster.
But, with this, time just doesn’t matter. The Step takes however long the Step takes. I stand back and look things over, ponder my approach, examine it for potential pitfalls, and search for better ways (like using bolts instead of screws, for instance).
For starters, the pucks themselves. Their neatly round shape seemed easy enough, but each has these prongs (they call them “schrapnel”, wtf?) that will compress inward as you jam the puck through the hole, and then spring outward to hold it in place. At first, that seemed nifty.
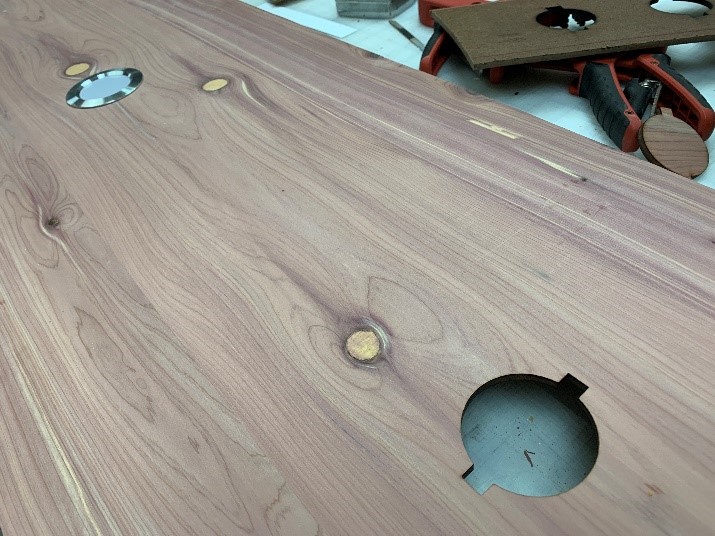
But what if the light burns out, goes bad, malfunctions, needs to be replaced? Maybe you just pry it down and rip it out? I dunno. But it didn’t seem as fool proof as this fool would like it. So, I concocted a plan to cut a more precise hole around the puck itself, create two gaps for the prongs, and then rotate the puck to secure the prongs over the wood.
On the 75”-long panel, the end-most holes were precision cut with the laser at work. For the middle-most ones, however, which I could not finagle within the laser’s 24x18 workspace, I needed the 2.25” hole saw, and then the jigsaw to nudge out the gaps.
By comparison, the sawed holes were butt ugly, but they worked every bit as well, and the puck’s wide silver rim covers them anyway.
With the lights in place, it was time to
install the panels on the bottom of the
cabinet. (I
don't know why those lines are
indented. I can't unindent them, so
just let it slide.)
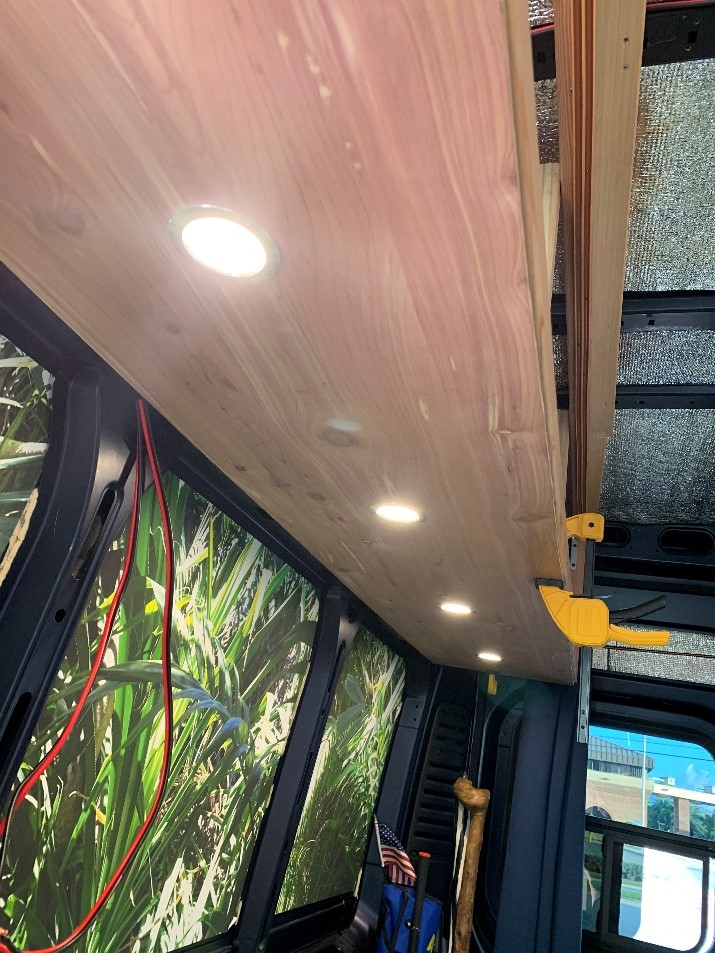
I really wanted to glue those panels on. A clean surface with no visible screws would look so fine. I figured a few dabs of Liquid Nails or Gorilla Wood Glue would be sufficient, but there was this gravity thing to contend with. I was not a fan of gravity when I was a collegiate triple jumper, and, in this instance anyway, I was finding it to be my adversary once again.
The aforementioned adhesives, though highly touted, do not bond instantly. They need time to squish and ooze into the surfaces, get intimate with the wood for a while before locking into commitment. That would be fine on a top surface, and maybe even a propped-up side, but for the bottom, where gravity can have its way, clamps are needed.
Well, no big deal; I have clamps. I bought four of those suckers back in March. I did not know what I’d be needing them for, but I was in HD and I vaguely recalled seeing “clamps” on somebody’s list of things to have when doing something or other, so I bought ‘em. Six months later, the occasion arose.
But I couldn’t use ‘em! With the cabinet already bolted to the wall, I had no way to clamp the back. Clamping the front and sides wasn’t even close to good enough. That six-foot-long panel was Sag City in back, and that compromised the rest.
So, I punted on glue
I repeated the process, albeit in three segments on the DS. The one wrinkle was that center rib bulge that had confounded me in the frame stage. I could have caved in and just cut my underside panel an inch narrower, which was where I’d be screwing into the stick anyway, but I had the chance to do it a little better, so I took it.
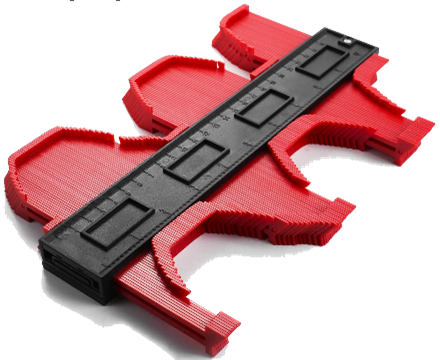
Months ago, I also bought a contour gauge. You know, one of those things that conforms to an odd-shaped surface so you can trace it and cut accordingly? Yes, one of those. It came in right handy for the bulge. I pressed it against the rib, locked it, then traced in onto cardboard, scanned it into digits, converted the digits into a vector cut line in Corel, and then laser-cut a perrrrfect fit in that underside panel. (No, that’s not the shape of the rib; that’s the sample photo from Amazon.)
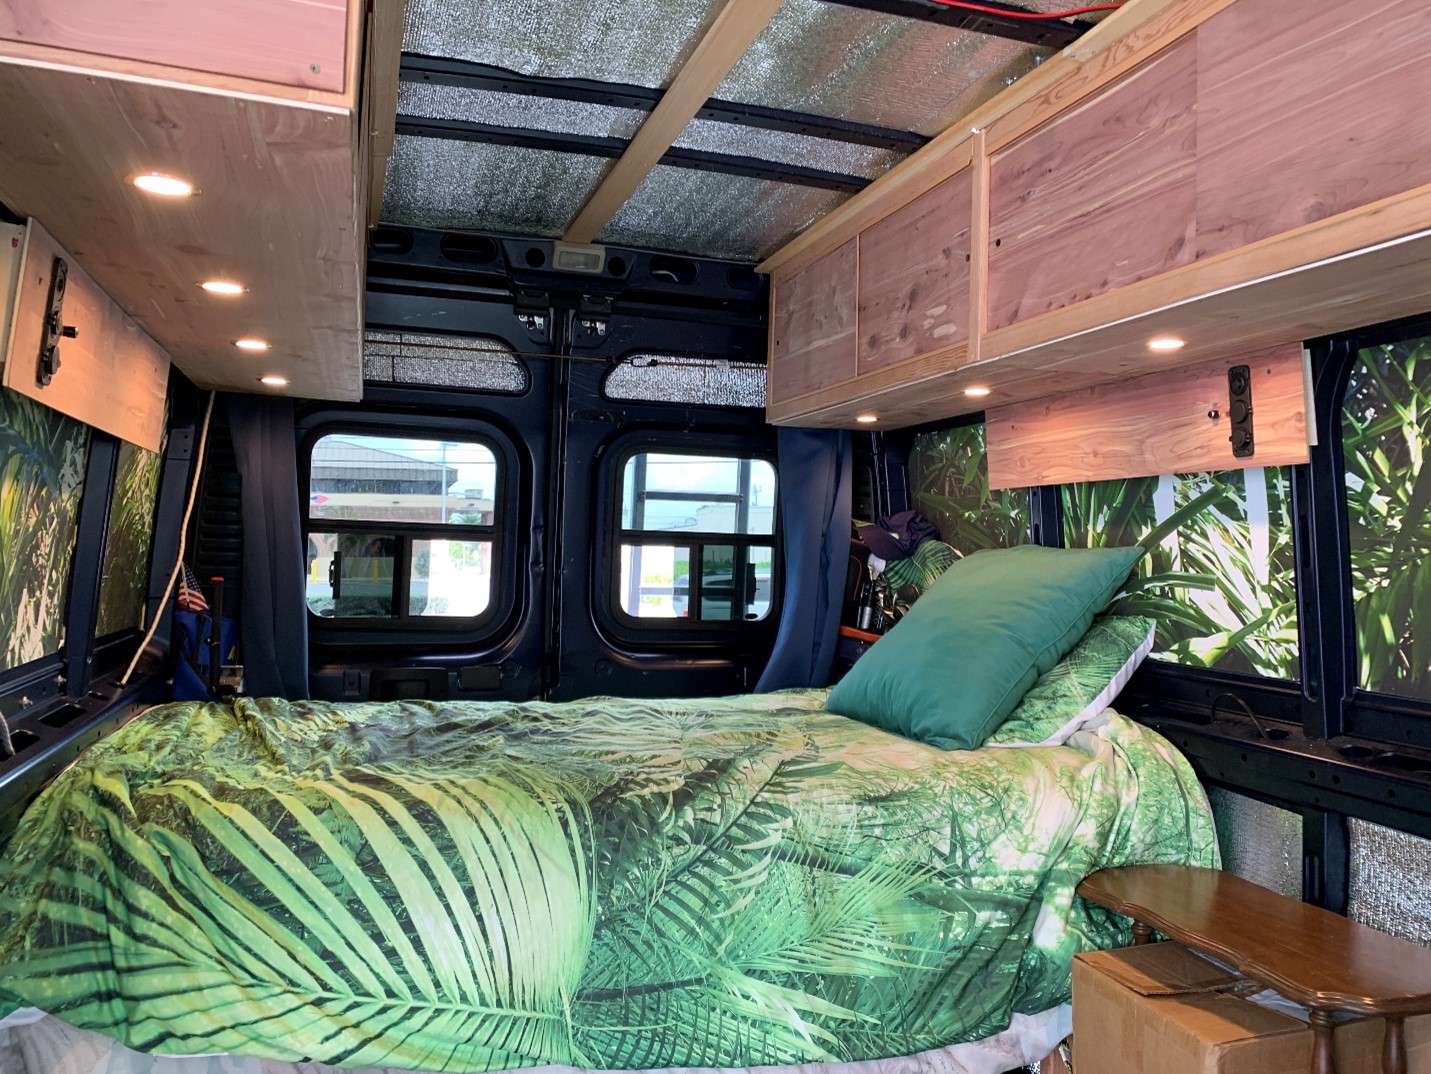
The cabinets themselves were complete! And there was great rejoicing.
However, lights that don’t light up are pretty useless. They look cool by day, but not so much in darkness.
THE
UPPER DECK
Part
4: Lighting the Lights Aloveco Dimmer Light Switch – 2 for $36 12 AWG stranded copper wire, red/black, 30’
As dumb as this sounds, I now had to remove the doors and the hardboard floors. They were just In The Way. Like I said, those floors were being left loose for a reason, and this was it.
The Anypowk lights are well-designed. Each puck has about 6’ of wire, with a clip that snaps neatly into a small white plastic “connection box.” The box accommodates six lights. In the end of that box, another wire plugs in. That wire contains the + and – leads to the power source. Those leads are clearly marked.
But that was way too simple for me. My electricity was going to have to pass through a dimmer switch before it could reach these pucks. My first choice – by Aloveco, pretty much just a ½” round knob with wires coming out the back -- was sold out on Amazon, so I bought a couple that they showed in the “Customers Also Bought…” area. Well, customers bought the wrong shit because those were for plugging into a wall switch on house current. Bah.
When you get switches and outlets and such for your van build, you gotta remember that while the visible part may look compact and neat, most of the gadget’s mass is behind the wall, and that’s going to need some room.
The dimmer wasn’t bad at all – maybe ½” plus a little extra for the wires to bend -- but, while I was at it, I was also going to install a 6” wide black plastic panel with a toggle switch, a 12V socket, and a dual USB charging port. Seemed like a handy thing to have. But the sockets extend way back about 2” or more so you can’t insert them just anywhere.
This called for an on-the-fly change of plans. But this, too, was practice. I’d really be wiring the stuff, but the placement on the wall would be temporary. The walls and everything affixed to them would not be finalized until all the windows and furniture were done. What I did here would be around for, I dunno, a year? A few months? And if I end up deciding that I prefer this configuration, then I’ll dress it up and make it permanent.
I chose that spot – spanning two of the middle-back ribs just below the cabinets, identical on both walls – because it was easily reached while fat-assing on the bed. I mean, who likes to get up to adjust the lights?? No matter which way I’m facing, I’ll have one dimmer near my head, and one that I can adjust with my toes.
The USB charger ports are also ideal next to the bed. I charge my phone and iPad every night. I just plug them in, leave them on my bed table – the iPad is my alarm clock anyway – and have them fully charged the next day. People who let their phones die are dumbasses. Just charge it overnight, Dwight.
So, I cut two of my leftover pieces of cedar down to nice 30” x 8” ones, perfect for rib-spanning. The laser cut hyper-accurate holes in it for the dimmer and the sockets-thing. I cut 2 six-inch-long pieces of 2x4 and drilled-n-screwed them into the middle ribs. That gave barely enough room for the hardware and wires.
BUT … before I could mount those switch-boards onto the walls, I had to wire up the suckers. That required taking a little time to wrap my head around it all. I had bought plenty of wire, some of which I’ll probably never use.
Solid wire was my first mistake. Wire is either stranded – made up of many hair-thin strands of copper – or solid (one solid core). Solid wire is crazy hard to work with: flexibility is horrible. So, those two small spools are just taking up space now.
I got a spool of 12 AWG (American Wire Gauge) stranded red and a spool of 12-gauge black. Then I thought, that was freaking dumb; why didn’t I get one spool of both together? Duh. This I now did. So, those two spools look like extras now too.
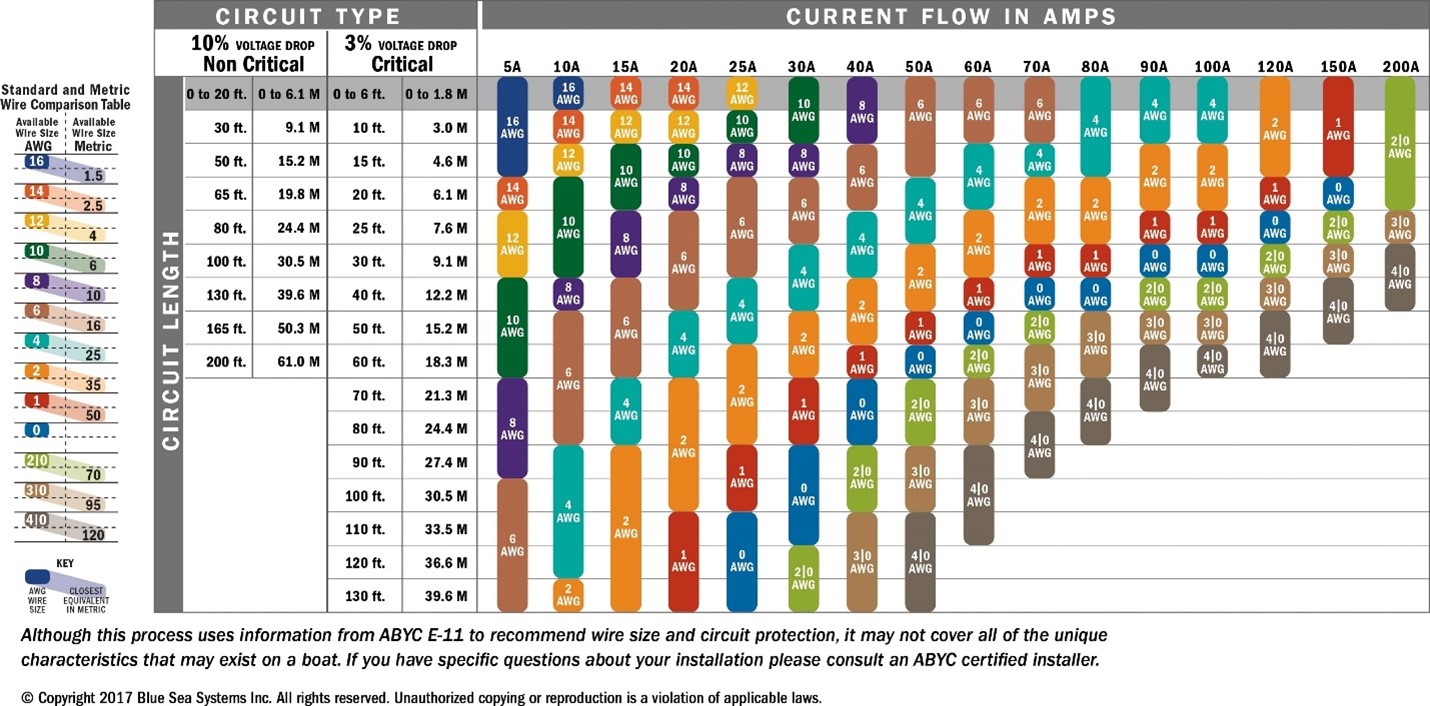
12 AWG is actually pretty thick wire. It’s nothing like your car’s battery cable (which is 6 AWG, or maybe 4, I forget), but it’s a good bit thicker than speaker wire. My YouTube mentor Will Prouse had a video in which he discussed all things wire, and I was left with the sense that Too-Thick was never a problem, but Too-Thin often is. Check out this chart. You use it to figure out what gauge wire you should use, factoring in the amps and the distance they need to travel:
Ya, right, right? Right. Got all that? Me too.
Adding to the confusion, all the wires that came connected to the dimmer switch and the USB ports were TINY. My 12 AWGs dwarfed these things. They had to be around 20 or 22 … I guess?
But I hooked them up with female disconnects on the outlet posts, and with female-to-male pairs coming off the puck light leads, ran the passenger side wires up through the cabinets and across the ceiling, ran the driver side stuff through the spaces in the ribs, and connected them to the fuse box -- some with ring connectors and some with blade connectors.
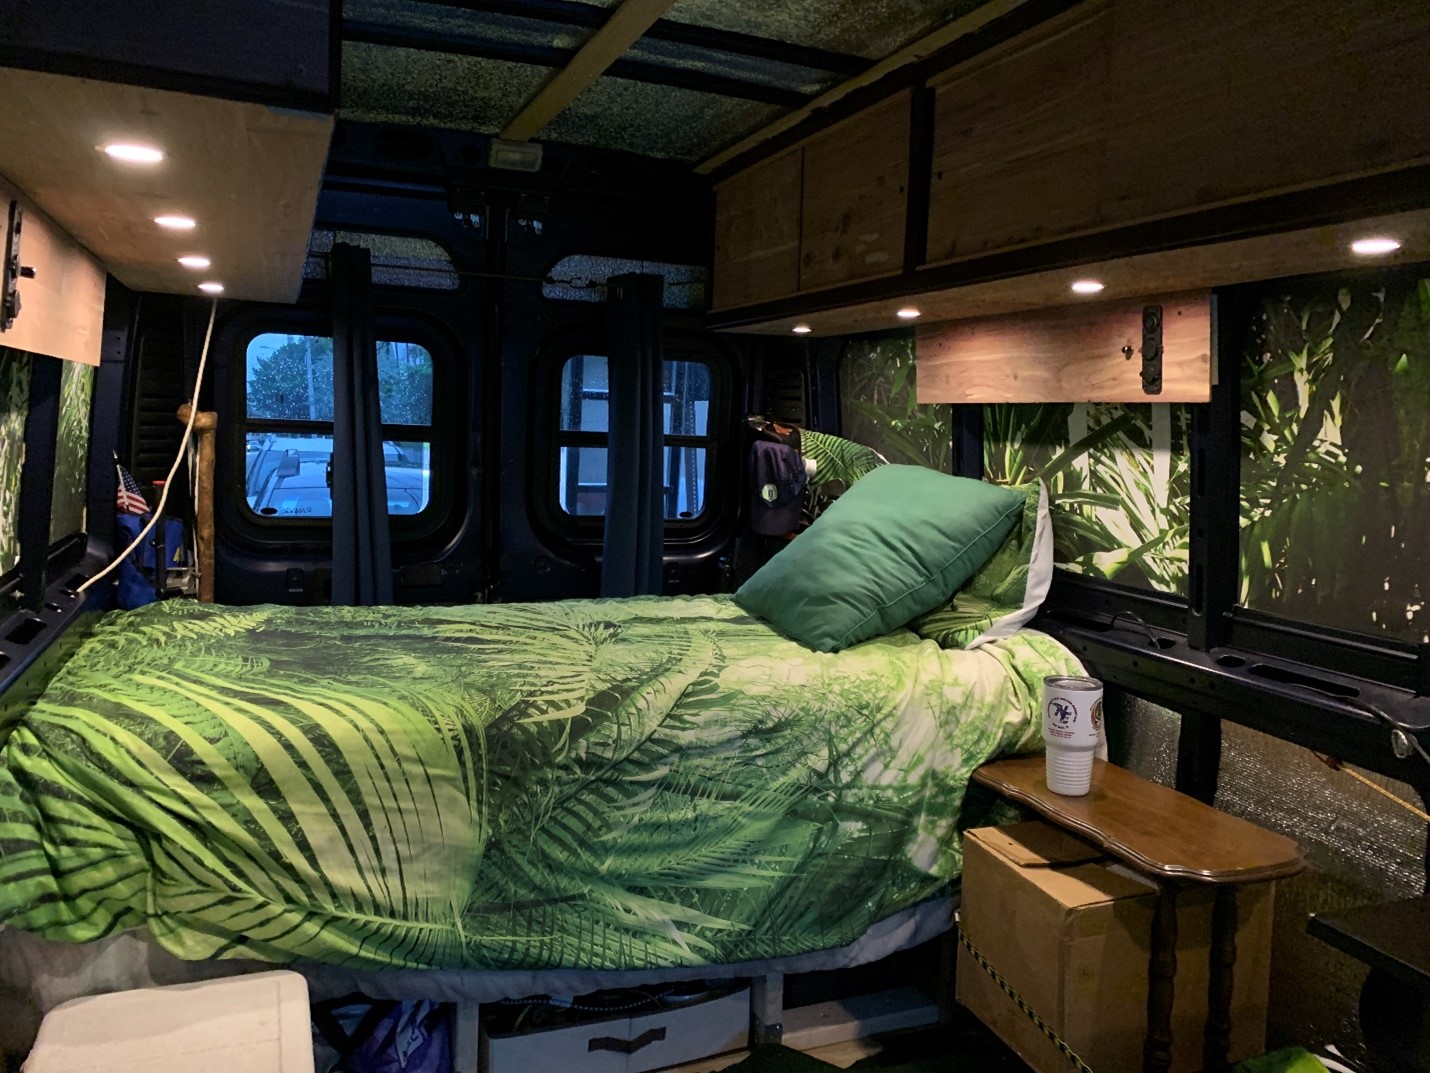
I turned the Maxoak Bluetti EB240 back on and – voila! – we have lights and powered outlets!
THE UPPER DECK Part 5: Contrast With Cognac Varathane 1 qt. Cognac Premium Fast Dry Interior Wood Stain -- $9 1" foam brushes -- $0.50 each 1
roll of 1" blue painters' tape -- $2.99 (I
think)
Well, not quite yet. Something wasn’t clicking.
I liked the coloring of the Douglas Fir 2x2s, and I love the look of the cedar panels, but together, ehhhh, they just weren’t singing to me. I hemmed and hawed – mostly hawed (I don’t hem much) – for a few days and then decided to go for more contrast.
It’s so hard to tell color from the web site or from the can. Stain was preferred over paint. The Douglas Fir had a nice grain that I didn’t want to bury under opaque paint. The somewhat-reddish-tinted-brown stain called Cognac struck my fancy.
On a small scrap, it looked painted more than stained. It was darker than I pictured, but I did want it dark, didn’t I? I took almost a week looking at it sitting beside a cedar scrap, waiting for it to either sing or cough.
Eventually, I caved. Testing tint after tint just didn’t appeal to me. Cognac would work well enough.
So, on a showery Sunday afternoon, I took my quart, a couple of foam brushes, and a roll of thin blue painter’s tape (even though it was stain, not paint – there was no stainer’s tape available) out to where Blue Maxx was parked on Southard Street, opened the back and side doors, and got to work.
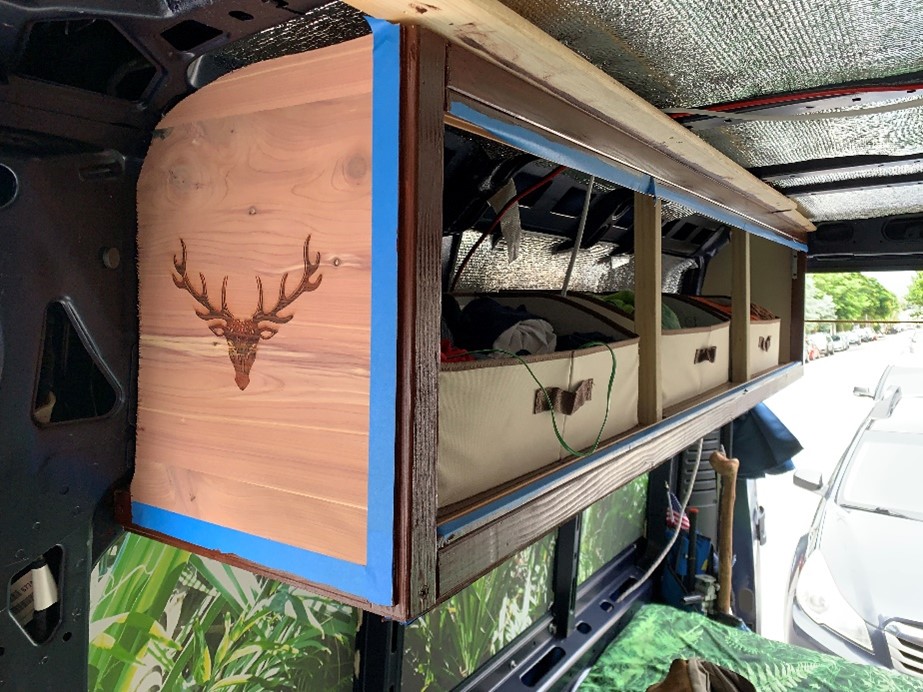
By the way, that stag’s head that adorns the frontmost panel of the p-side cabinets is laser-engraved into the wood. The device comes in downright handy in a project like this. I don’t know if it’s worth spending $17K on one just to do a van conversion – that $17K would buy you a whole lotta Steps – but if you have access to one at work, then what the hey.
The stag is the prominent aspect of my family’s coat-of-arms, so the engraving is a nod to Clan MacKenzie worldwide.
Taping took almost as long as the brushwork did. It was a slow and careful process, as I had chosen to stain not just the faces, but all visible fir, as well as the ¼” sides of all the cedar panels. Still, the whole thing took only about two hours. I think it’s a good look.
NOW, the Upper Deck was complete! |


